After you configure your website with the Cobrowse script tag, there will be no visible UI for starting a Cobrowse session. Most customers do not want the Cobrowse UI to be visible while the visitor is not in session, so by default, it is hidden.
Glance recommends that you place a clickable element (like a "Cobrowse" link or button) in the footer of every web page. An agent can then ask the visitor to scroll to the bottom and click that element to start a session.
Add a Button to your Webpage
To trigger the session, you can add the data-glancebutton="startSession" attribute to an existing element, or use one of the JavaScript commands below:
data-glancebutton="[Glance action]" to your page will prevent the Presence event from firing. If Presence is needed, utilize the JavaScript methods below instead of the data attribute. Method 1: showTerms
The showTerms command opens the Terms and Conditions modal with Accept/Decline buttons. Clicking Accept starts the session. This is the recommended method for compliance.
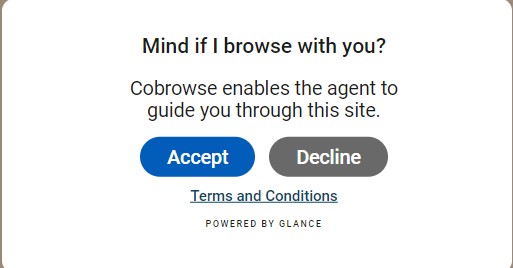
Use the following code to add the showTerms command to your website:
<a href="#" id="show-cobrowse-js" onclick="showTerms(); return false;">Cobrowse with an Agent</a>

<script>
  function showTerms() {
    // GLANCE_KEYTYPE_RANDOM generates a random 5-digit code
    GLANCE.Cobrowse.Visitor.showTerms({
      sessionKey: 'GLANCE_KEYTYPE_RANDOM'
    });
  }
</script>
Method 2: startSession
The startSession command starts a session immediately (and displays the Cobrowse UI) without a secondary acceptance modal.
Use the following code to add the startSession command to your website:
<a href="#" id="start-cobrowse-js" onclick="startSession(); return false;">Start Cobrowse Session</a>

<script>
  function startSession() {
    GLANCE.Cobrowse.Visitor.startSession("GLANCE_KEYTYPE_RANDOM");
  }
</script>
Style the Button
You can customize the look and feel of the default button and modal directly in Account Management.
- Log in and go to Account Management > Settings.
- Click Manage your Cobrowse settings in the bottom right corner.
- Select Manage Cobrowse customizations to open the Cobrowse customization tool.
Default vs. Custom UI
Glance provides a default Cobrowse UI (the border, the session code bar, and the end session button). This is loaded automatically.
If you wish to build a completely custom interface (e.g., your own React/Angular components), you can suppress the default UI:
- Set
data-ui="custom"on your script tag to prevent loading the default UI script. - Implement the
setUIReady()call in your code. - Listen for session events to update your own UI.
Refer to the Cobrowse Visitor API page to customize the visitor experience.
Session Code
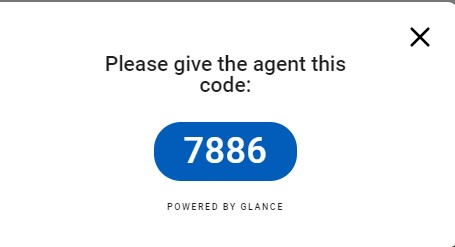
Every Cobrowse session has a Session Code. This is a unique identifier available to both the visitor and agent, allowing them to connect.
The code may be randomly generated and exchanged over the phone, or it can be assigned automatically via integration with the customer website.
After an unidentified visitor clicks the Show button, the session code is displayed: