/api/v0/groups/{groupId}/roles
### Request Body
| Parameter | Type | Description |
|---|---|---|
name |
string | Required. Name (Max 70 chars). |
settings |
object | Permission settings. |
| Field | Type | Description |
|---|---|---|
roleId |
integer | The ID generated for the new role. |
name |
string | The role name. |
/api/v0/groups/{groupId}/roles/{roleId}
### Path Parameters
| Parameter | Type | Description |
|---|---|---|
roleId |
integer | Required. Role ID. |
| Field | Type | Description |
|---|---|---|
roleId |
integer | The unique ID of the role. |
settings |
object | Full list of permissions. |
/api/v0/groups/{groupId}/roles
### Request Body
| Parameter | Type | Description |
|---|---|---|
roleId |
integer | Required. ID to update. |
| Field | Type | Description |
|---|---|---|
status |
string | Returns "ok" if successful. |
Role must be unused before deletion.
/api/v0/groups/{groupId}/delete-roles
### Request Body
Array of Role IDs.
### Response Schema
| Field | Type | Description |
|---|---|---|
status |
string | Returns "ok" if successful. |
data-glancebutton="[Glance action]" to your page will prevent the Presence event from firing. If Presence is needed, utilize the JavaScript methods below instead of the data attribute.
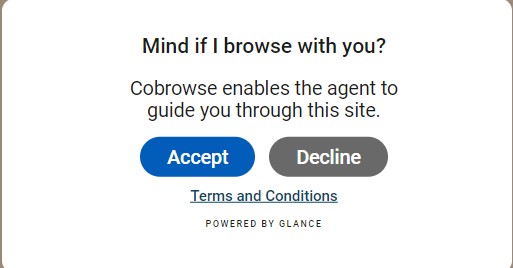 Use the following code to add the `showTerms` command to your website:
```html
Cobrowse with an Agent
```
---
### Method 2: startSession
The `startSession` command starts a session immediately (and displays the Cobrowse UI) without a secondary acceptance modal.
Use the following code to add the `showTerms` command to your website:
```html
Cobrowse with an Agent
```
---
### Method 2: startSession
The `startSession` command starts a session immediately (and displays the Cobrowse UI) without a secondary acceptance modal.
 Use the following code to add the `startSession` command to your website:
```html
Start Cobrowse Session
```
---
## Style the Button
You can customize the look and feel of the default button and modal directly in Account Management.
1. Log in and go to **Account Management > Settings**.
2. Click **Manage your Cobrowse settings** in the bottom right corner.
3. Select **Manage Cobrowse customizations** to open the [Cobrowse customization tool](https://help.glance.cx/glance-cobrowse/glance-cobrowse-customizing/cobrowse-widget-customization/).
## Default vs. Custom UI
Glance provides a default Cobrowse UI (the border, the session code bar, and the end session button). This is loaded automatically.
If you wish to build a completely custom interface (e.g., your own React/Angular components), you can suppress the default UI:
1. Set `data-ui="custom"` on your script tag to prevent loading the default UI script.
2. Implement the `setUIReady()` call in your code.
3. Listen for session events to update your own UI.
Refer to the [Cobrowse Visitor API](/api) page to customize the visitor experience.
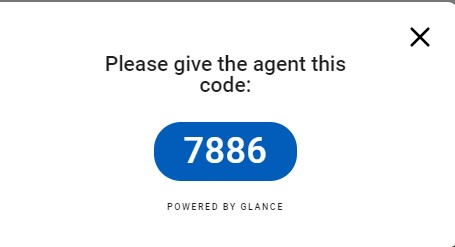
## Session Code
Every Cobrowse session has a **Session Code**. This is a unique identifier available to both the visitor and agent, allowing them to connect.
The code may be randomly generated and exchanged over the phone, or it can be assigned automatically via integration with the customer website.
After an unidentified visitor clicks the **Show** button, the session code is displayed:
=================================================================
FILE: /developer/glance-cobrowse/attributes
=================================================================
The script tag generator allows Glance administrators to modify attributes to create a custom script tag that enables Cobrowse on websites. This user-friendly interface will let users fill out each individual attribute for the script tag and then generate a script that can be copied and pasted into their website.
Use the following code to add the `startSession` command to your website:
```html
Start Cobrowse Session
```
---
## Style the Button
You can customize the look and feel of the default button and modal directly in Account Management.
1. Log in and go to **Account Management > Settings**.
2. Click **Manage your Cobrowse settings** in the bottom right corner.
3. Select **Manage Cobrowse customizations** to open the [Cobrowse customization tool](https://help.glance.cx/glance-cobrowse/glance-cobrowse-customizing/cobrowse-widget-customization/).
## Default vs. Custom UI
Glance provides a default Cobrowse UI (the border, the session code bar, and the end session button). This is loaded automatically.
If you wish to build a completely custom interface (e.g., your own React/Angular components), you can suppress the default UI:
1. Set `data-ui="custom"` on your script tag to prevent loading the default UI script.
2. Implement the `setUIReady()` call in your code.
3. Listen for session events to update your own UI.
Refer to the [Cobrowse Visitor API](/api) page to customize the visitor experience.
## Session Code
Every Cobrowse session has a **Session Code**. This is a unique identifier available to both the visitor and agent, allowing them to connect.
The code may be randomly generated and exchanged over the phone, or it can be assigned automatically via integration with the customer website.
After an unidentified visitor clicks the **Show** button, the session code is displayed:
=================================================================
FILE: /developer/glance-cobrowse/attributes
=================================================================
The script tag generator allows Glance administrators to modify attributes to create a custom script tag that enables Cobrowse on websites. This user-friendly interface will let users fill out each individual attribute for the script tag and then generate a script that can be copied and pasted into their website.
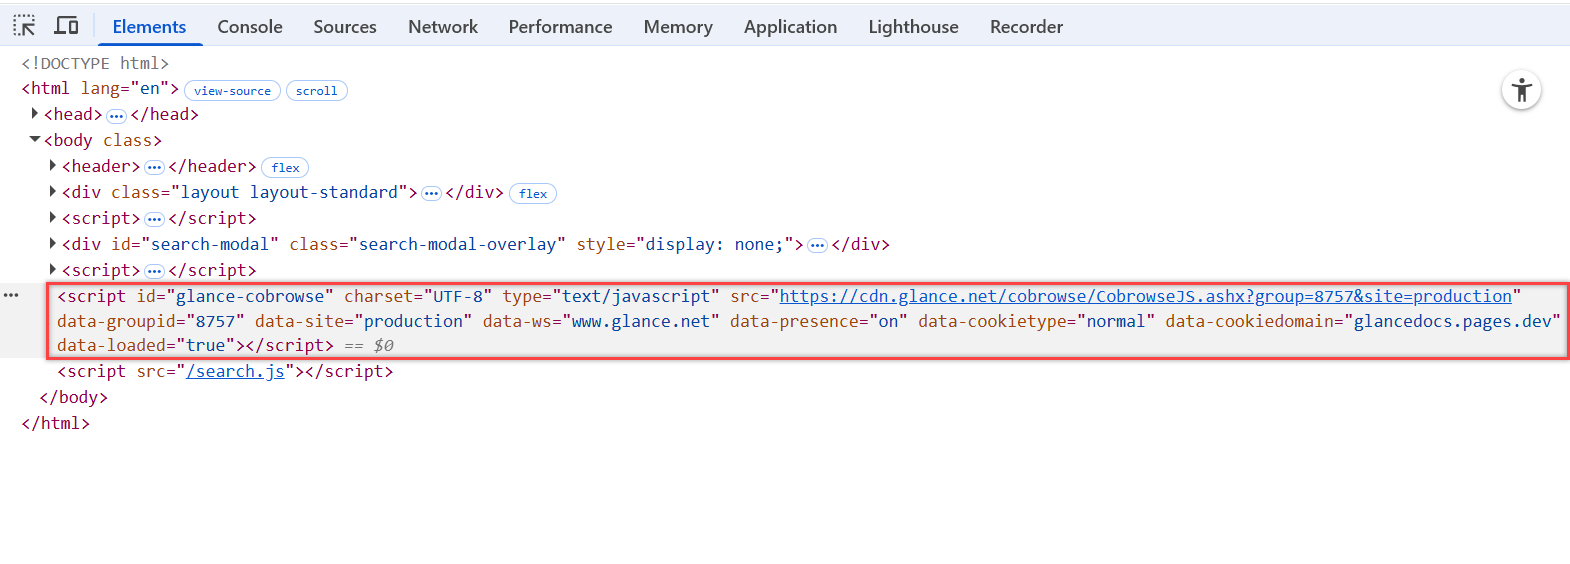
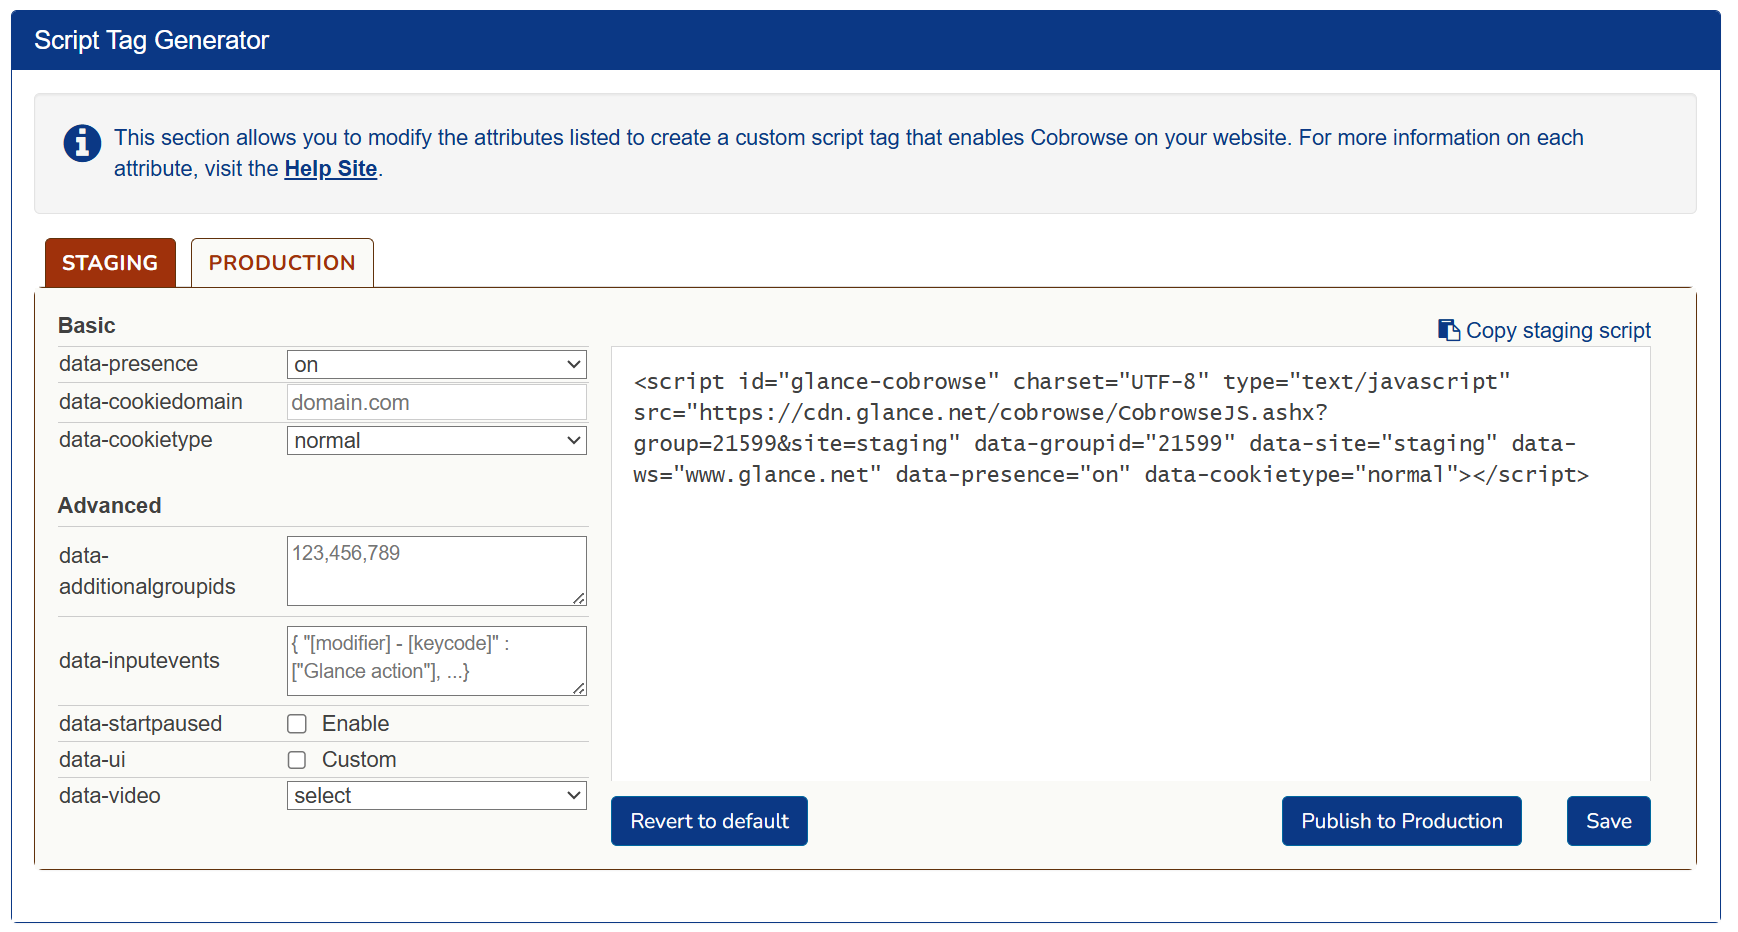 The following attributes can be found within the script tag.
## Read-Only Tag
Read-only attributes are generated based on previous selections made by the user. The following attributes are generated within the script as read only:
* **script id** - The identifier used for this script, defaults to `glance-cobrowse`.
* **src** - The source of the cobrowse loader script.
* **data-groupid** - Your assigned Group ID number provided by Glance.
* **data-site** - The environment (staging or production) that this tag will be deployed to. Select the **Staging** or **Production** tab to identify what needs to be generated for this script.
* **data-ws** - The webserver being used (e.g., `www.glance.net`). When implementing the script tag on your website, this can be changed for use in beta or a customer-specific environment.
The following attributes can be found within the script tag.
## Read-Only Tag
Read-only attributes are generated based on previous selections made by the user. The following attributes are generated within the script as read only:
* **script id** - The identifier used for this script, defaults to `glance-cobrowse`.
* **src** - The source of the cobrowse loader script.
* **data-groupid** - Your assigned Group ID number provided by Glance.
* **data-site** - The environment (staging or production) that this tag will be deployed to. Select the **Staging** or **Production** tab to identify what needs to be generated for this script.
* **data-ws** - The webserver being used (e.g., `www.glance.net`). When implementing the script tag on your website, this can be changed for use in beta or a customer-specific environment.
 *Example configuration:*
- **Domain:** `www.abc.com`
- **Helper Page URL:** `https://www.abc.com/glancehelper`
*Example configuration:*
- **Domain:** `www.abc.com`
- **Helper Page URL:** `https://www.abc.com/glancehelper`
 4. In the bottom left corner of the **Settings** tab, click on **Manage your Cobrowse settings**. Scroll down to the **Script Tag Generator** section.
---
## 2. Customize the Script Tag
Modify your script tag by updating the attributes directly in the generator. Refer to the [Attributes Guide](/attributes) for a complete breakdown of each option.
4. In the bottom left corner of the **Settings** tab, click on **Manage your Cobrowse settings**. Scroll down to the **Script Tag Generator** section.
---
## 2. Customize the Script Tag
Modify your script tag by updating the attributes directly in the generator. Refer to the [Attributes Guide](/attributes) for a complete breakdown of each option.
file:// urls and localhost:// won't work. You need to add an entry to your lmhosts file.
`input[id*=cardNumber]`
`input[id$=cardNumber]` --- ## Trouble Setting up Cross Domain Cobrowse? **Cross Domain Error: Untrusted Origin** If you are setting up cross domain Cobrowse, you must remember to enter the primary domain in the Glance backend in addition to the secondary domain that the visitor may be navigating to. If you don't, you will see an error that says `UNTRUSTED_ORIGIN`. --- ## Console Errors **404 error Getting the CustomSkin CSS file** Custom skin not yet created - this is harmless. **404 errors with CAM turned on** It is normal to get 404 errors on the visitor side when CAM (Cobrowse Asset Management) is turned on. The cobrowse script works by creating a copy of the browser DOM and sending it to the agent. To support CAM, resource URLs in the DOM copy are converted to relative urls. On the agent side, these relative urls combine with a `
This is a paragraph element in red
This is a paragraph element in red
``` To determine if invalid HTML is causing the issue, try running `GLANCE.checkHTML()` and `GLANCE.runTroubleshooter()` from the visitor-side browser console. These tools scan for common types of invalid HTML but may not catch every issue. If no problems are reported, try comparing the visitor's DOM to the agent's, focusing on the point where the structures begin to diverge. ================================================================= FILE: /developer =================================================================Developers
Tools, libraries, and guides to help you integrate Glance's co-browse and video capabilities directly into your web, mobile, and desktop applications.
https://docs.glance.net/llms.txt
View File →
 ## Prerequisites
* All high-level prerequisites as listed in the [Getting Started](../agent_workspace/) section.
* Access to an [Amazon Connect Instance](https://docs.aws.amazon.com/connect/latest/adminguide/tutorial1-set-up-your-instance.html).
## Add the Glance Application
To incorporate the Glance Application in Amazon Connect:
1. Navigate to the Third-Party Applications section in Amazon Connect, and click **Add Application**.
## Prerequisites
* All high-level prerequisites as listed in the [Getting Started](../agent_workspace/) section.
* Access to an [Amazon Connect Instance](https://docs.aws.amazon.com/connect/latest/adminguide/tutorial1-set-up-your-instance.html).
## Add the Glance Application
To incorporate the Glance Application in Amazon Connect:
1. Navigate to the Third-Party Applications section in Amazon Connect, and click **Add Application**.
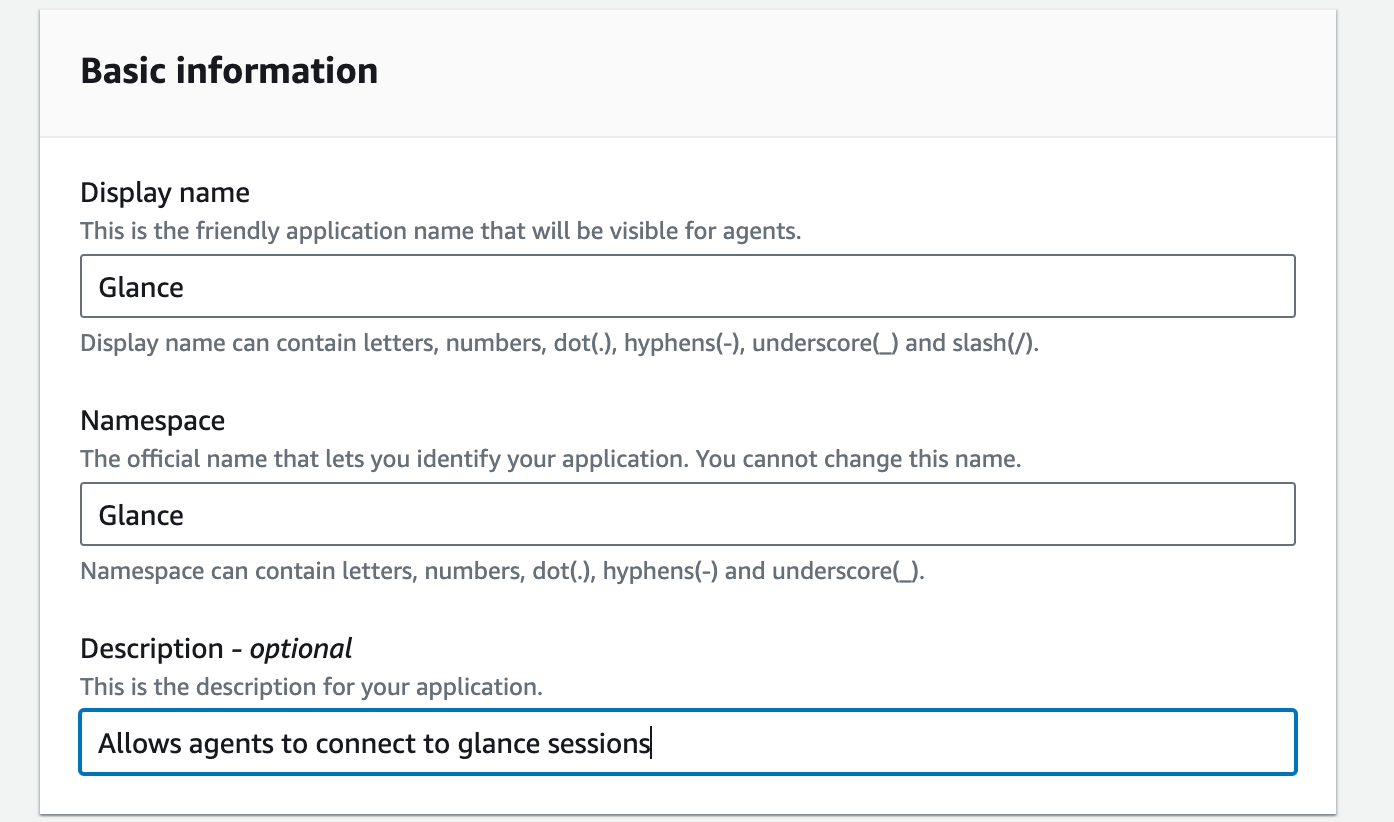
 2. Under **Basic Information**, input the following:
* For **Display name**, enter "Glance".
* For **Namespace**, enter "Glance".
* Enter an optional description for the Glance application.
2. Under **Basic Information**, input the following:
* For **Display name**, enter "Glance".
* For **Namespace**, enter "Glance".
* Enter an optional description for the Glance application.
 3. Under the **Access** section, enter the following:
* For **Access URL**, enter the URL provided by Glance.
* For **Approved Origins**, enter `https://www.glance.net`, and the URL for your IDP environment, e.g. `https://
3. Under the **Access** section, enter the following:
* For **Access URL**, enter the URL provided by Glance.
* For **Approved Origins**, enter `https://www.glance.net`, and the URL for your IDP environment, e.g. `https://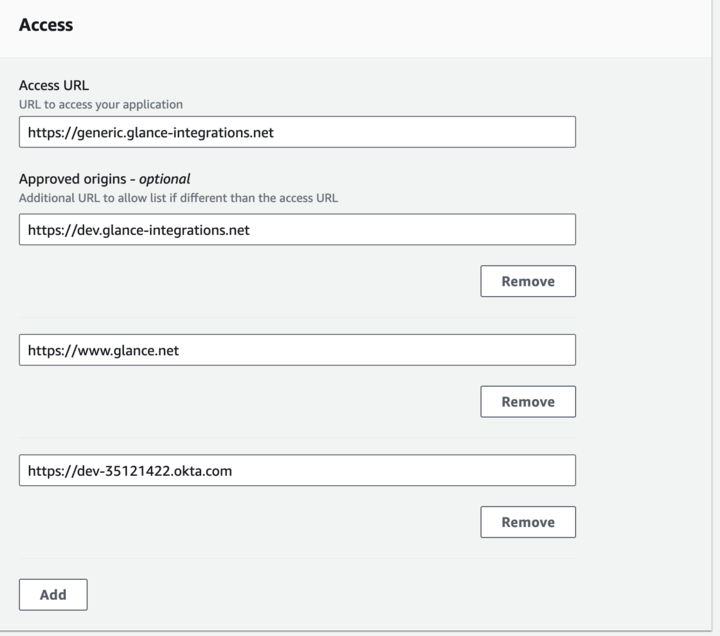 ## Joining Sessions from Amazon Connect
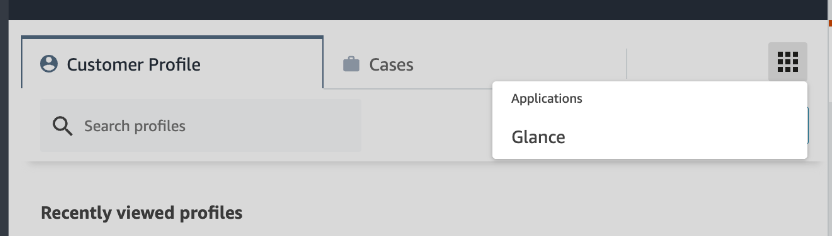
1. Navigate to the Agent Workspace application.
2. From the Agent Workspace, click the **Apps** menu and select the Glance application.
## Joining Sessions from Amazon Connect
1. Navigate to the Agent Workspace application.
2. From the Agent Workspace, click the **Apps** menu and select the Glance application.
 3. You will be prompted to sign in to your Identity Provider. Log in with your credentials.
4. The Glance application is now available and you can join Glance Sessions.
3. You will be prompted to sign in to your Identity Provider. Log in with your credentials.
4. The Glance application is now available and you can join Glance Sessions.
 =================================================================
FILE: /developer/integrations/agent_workspace/dynamics
=================================================================
## Prerequisites
* All high-level prerequisites as listed in the [Getting Started](../agent_workspace/) section.
## Add the Glance Application
The following steps describe how to embed Glance controls within the Customer Service Hub workstream.
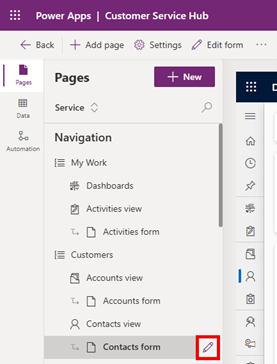
1. Click the **Pages** tab.
2. Select the view and form to add the Glance controls (i.e., **Customers** -> **Contacts view** -> **Contacts form**) then click the pencil icon.
=================================================================
FILE: /developer/integrations/agent_workspace/dynamics
=================================================================
## Prerequisites
* All high-level prerequisites as listed in the [Getting Started](../agent_workspace/) section.
## Add the Glance Application
The following steps describe how to embed Glance controls within the Customer Service Hub workstream.
1. Click the **Pages** tab.
2. Select the view and form to add the Glance controls (i.e., **Customers** -> **Contacts view** -> **Contacts form**) then click the pencil icon.
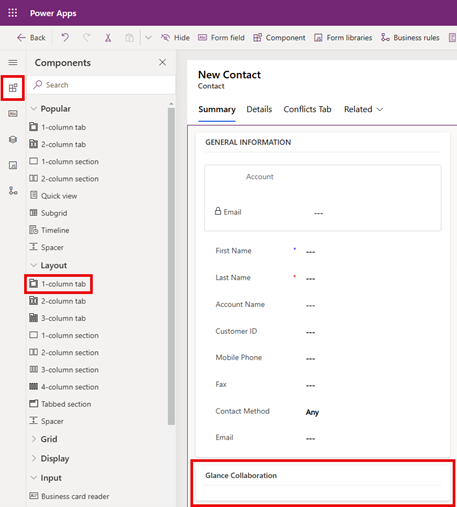
 3. Select the **Components** tab from the left menu, scroll down to the **Layout** section and drag **1-column tab** to the form on the right.
4. Rename the section to "Glance Collaboration".
3. Select the **Components** tab from the left menu, scroll down to the **Layout** section and drag **1-column tab** to the form on the right.
4. Rename the section to "Glance Collaboration".
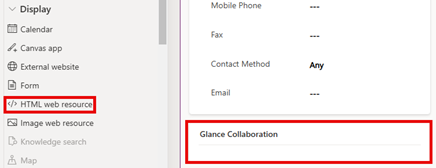
 5. Scroll down to the **Display** section and drag **</> HTML web resource** into the **Glance Collaboration** section.
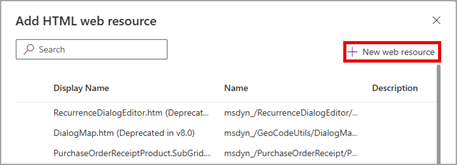
 6. Within **Add HTML web resource** click **+ New web resource**.
 7. Create an HTML file containing an iframe, replacing "GLANCE URL" with the organization-specific URL provided by Glance. For example:
```html
```
8. Click **Choose file** and upload the HTML file created in the previous step. Complete the rest of the form and click **Save**.
7. Create an HTML file containing an iframe, replacing "GLANCE URL" with the organization-specific URL provided by Glance. For example:
```html
```
8. Click **Choose file** and upload the HTML file created in the previous step. Complete the rest of the form and click **Save**.
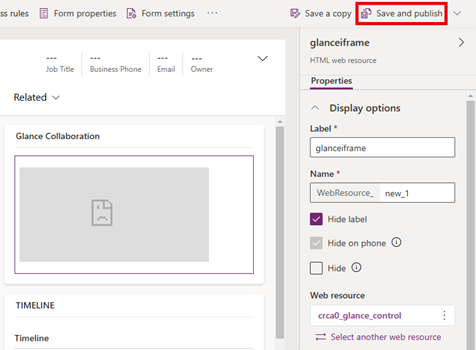
 9. Click **Save and publish** in the upper right corner. If changes to the iframe are required, utilize the **Properties** panel on the right.
 ## Joining a Session from Microsoft Dynamics
1. Navigate to the Dynamics Customer Service Hub.
2. Select either **Contacts** or **Cases** from the left navigation pane.
3. Click the **Summary** tab.
4. Log in with your credentials when prompted to sign in to your Identity Provider.
## Joining a Session from Microsoft Dynamics
1. Navigate to the Dynamics Customer Service Hub.
2. Select either **Contacts** or **Cases** from the left navigation pane.
3. Click the **Summary** tab.
4. Log in with your credentials when prompted to sign in to your Identity Provider.
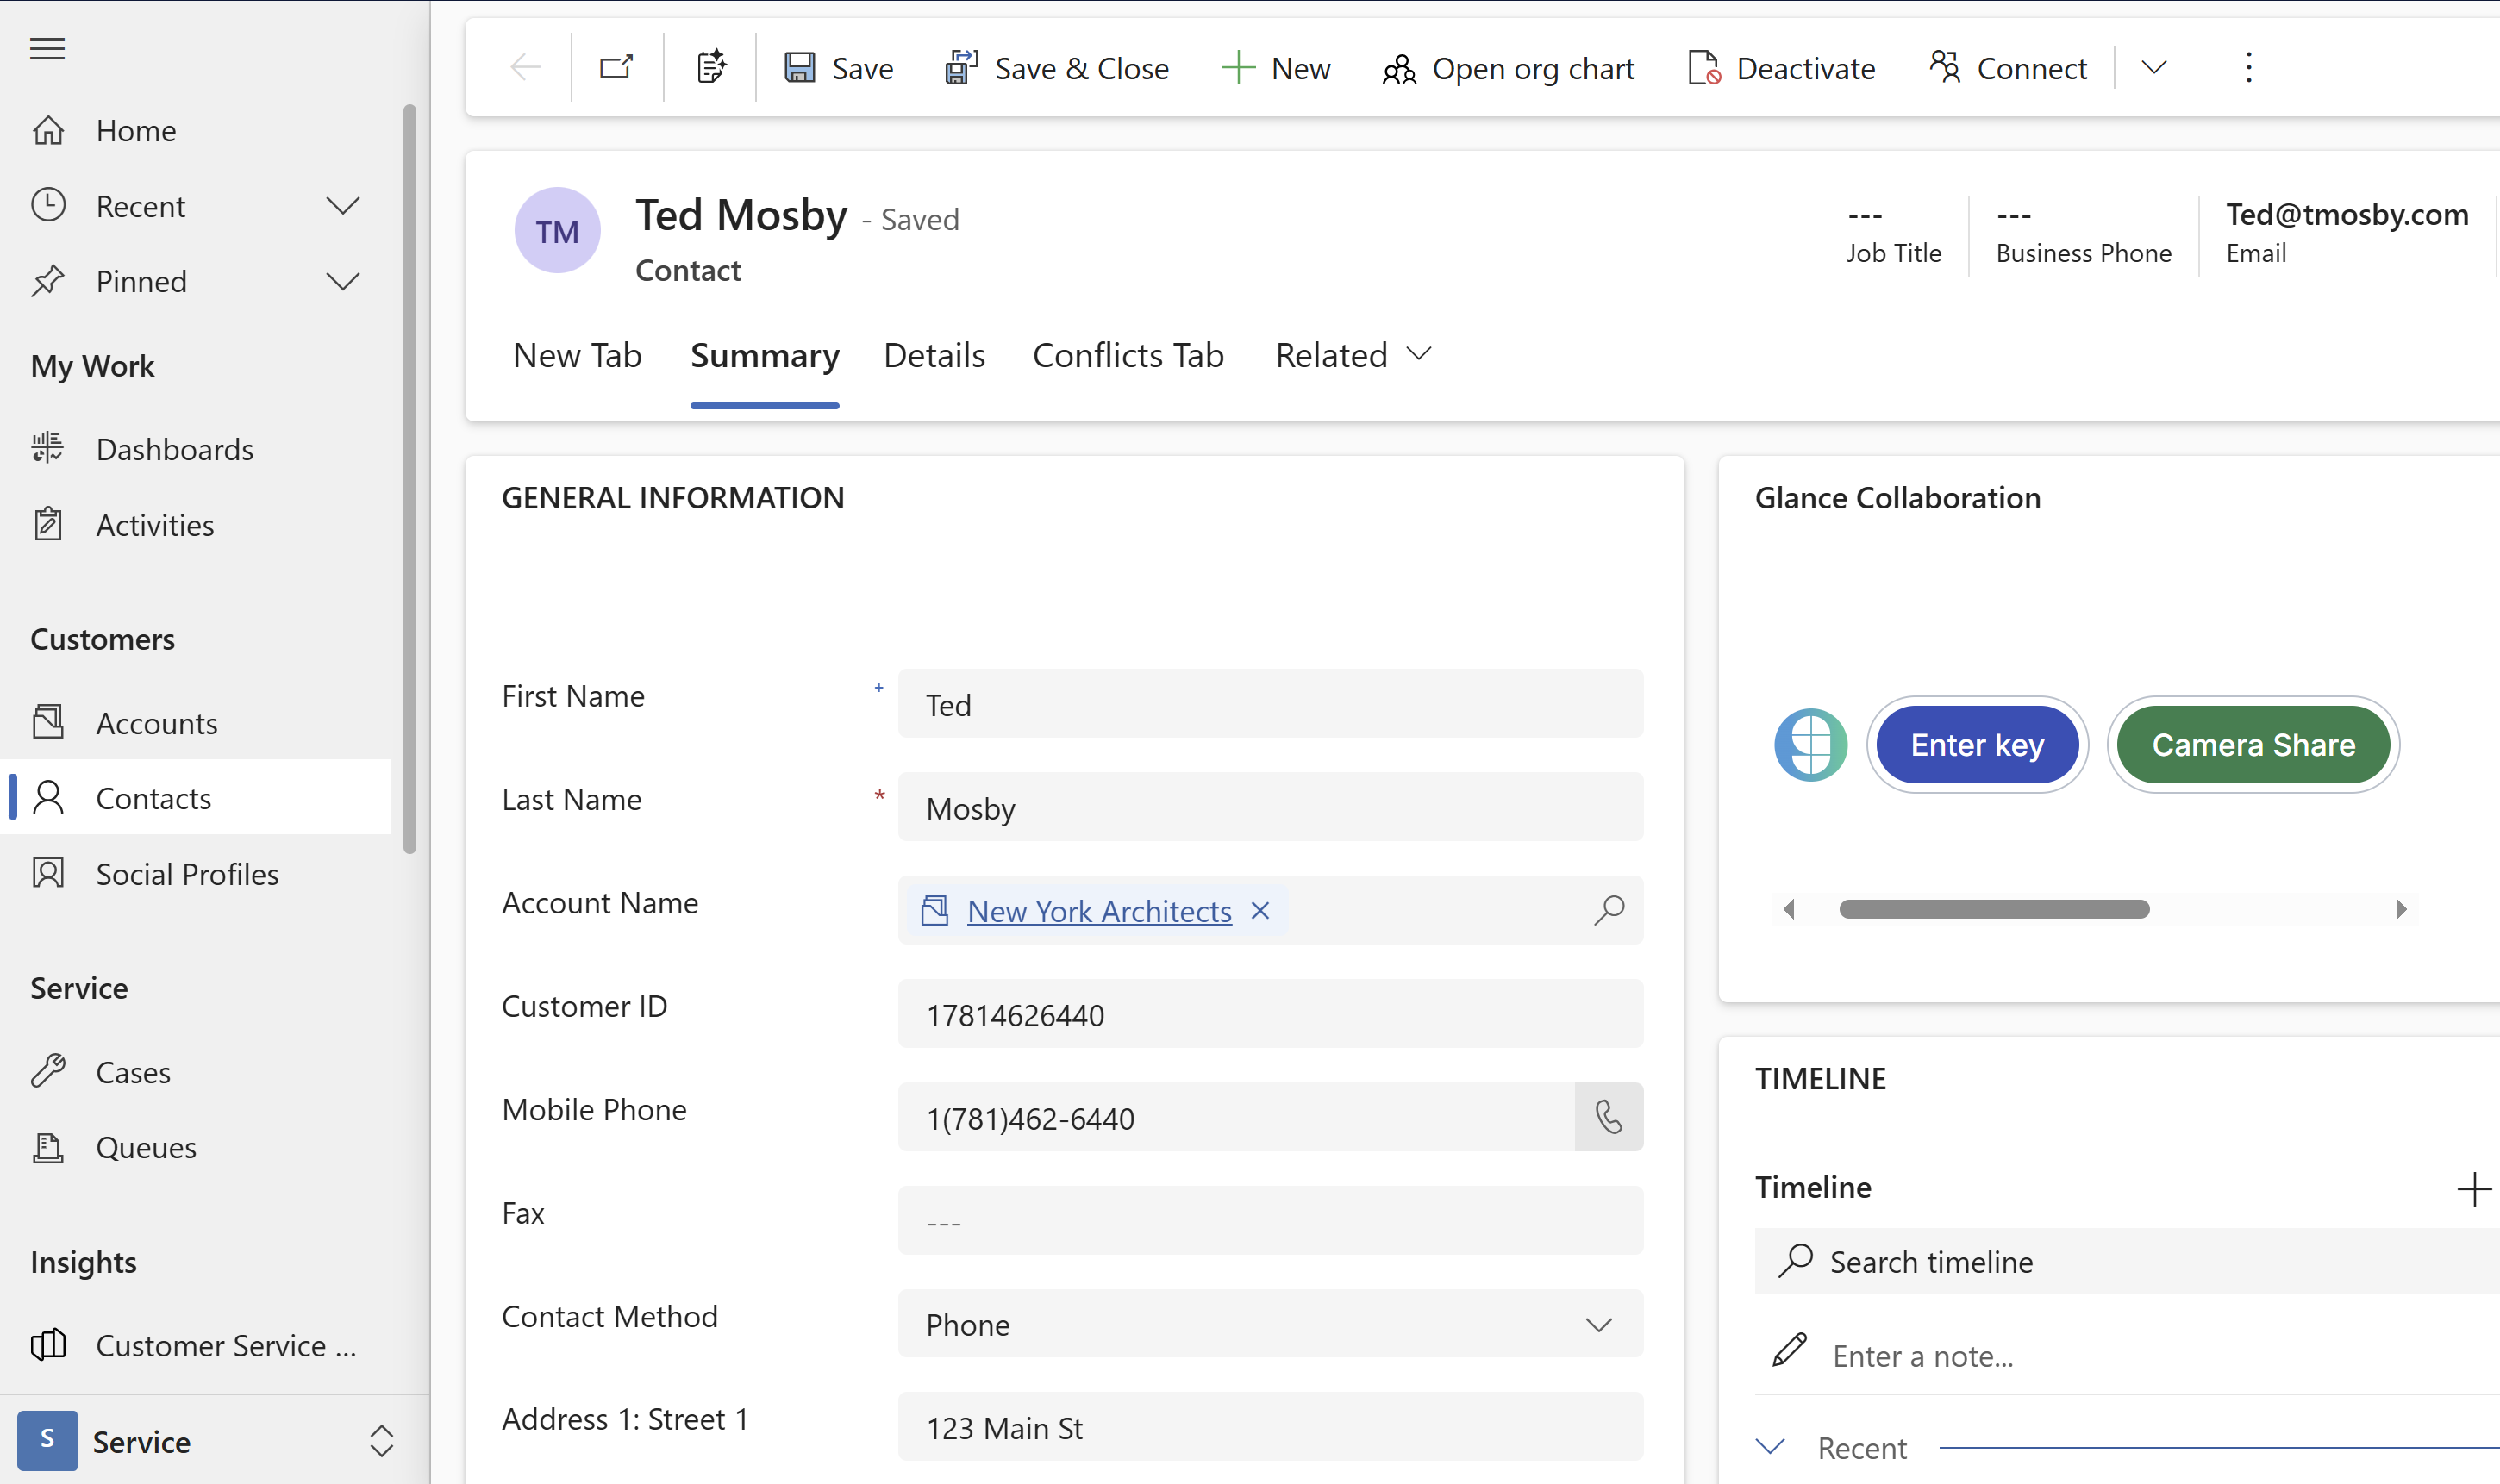 5. The Glance application is now available within the Glance Collaboration section.
=================================================================
FILE: /developer/integrations/agent_workspace/five9
=================================================================
5. The Glance application is now available within the Glance Collaboration section.
=================================================================
FILE: /developer/integrations/agent_workspace/five9
=================================================================
 ## Prerequisites
* All high-level prerequisites as listed in the [Getting Started](../agent_workspace/) section.
* Access to a Five9 Instance, and access to the Virtual Contact Center (VCC) Admin Application.
* You have created a campaign and associated skill for agents you want to utilize Glance.
* You've added the following URLs to the Allowed Sites list:
* In the Virtual Contact Center (VCC) application, navigate to **Actions > Configuration > Web > Web Sites Allowed to Access REST API (CORS)** section and add the following URLs:
* Your IDP URL, e.g. `https://
## Prerequisites
* All high-level prerequisites as listed in the [Getting Started](../agent_workspace/) section.
* Access to a Five9 Instance, and access to the Virtual Contact Center (VCC) Admin Application.
* You have created a campaign and associated skill for agents you want to utilize Glance.
* You've added the following URLs to the Allowed Sites list:
* In the Virtual Contact Center (VCC) application, navigate to **Actions > Configuration > Web > Web Sites Allowed to Access REST API (CORS)** section and add the following URLs:
* Your IDP URL, e.g. `https://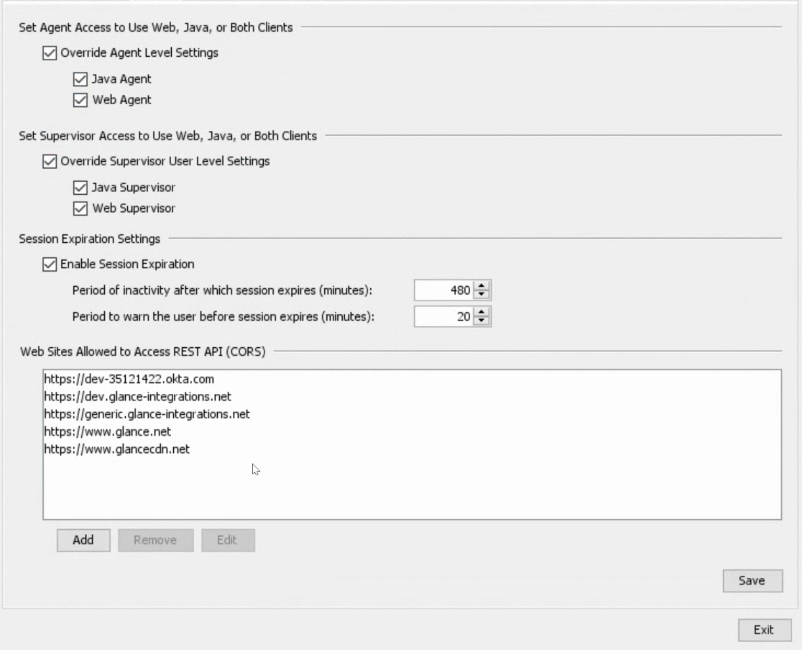 ## Add the Glance Connector to Five9
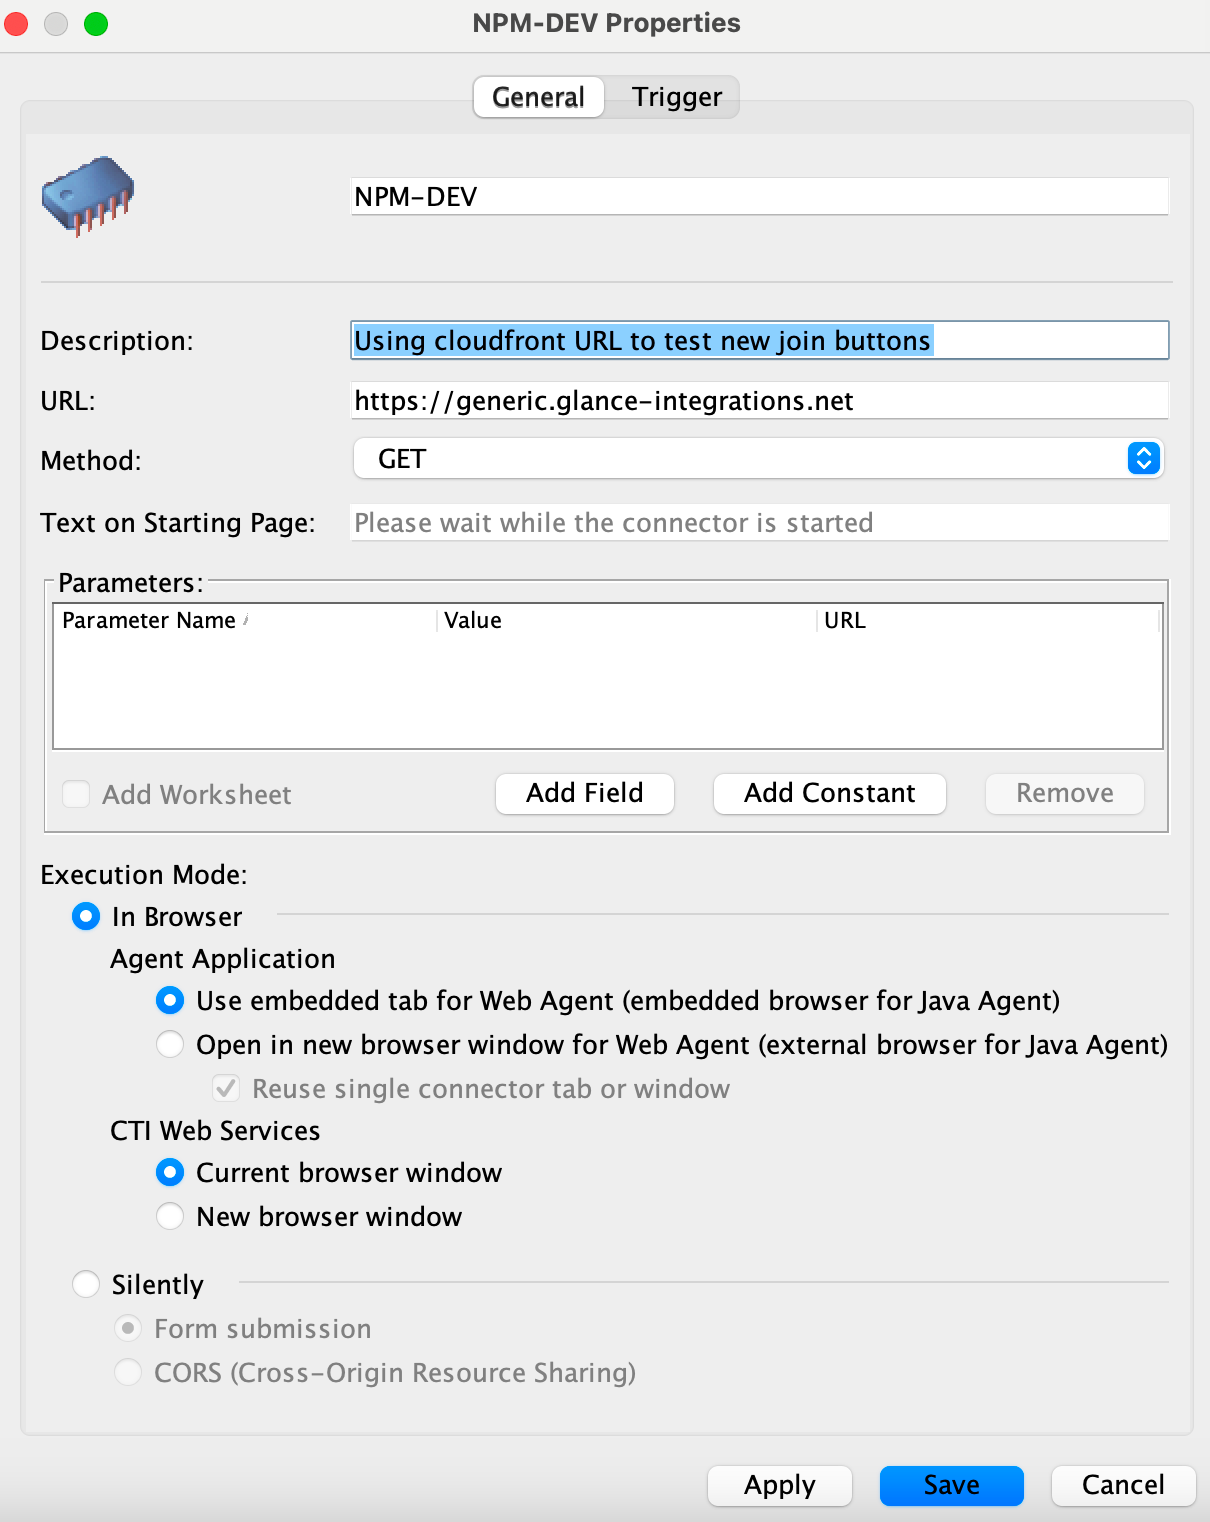
1. From the Virtual Contact Center (VCC) Admin Application, under the **Connectors** section, click the plus sign to create a new connector for Glance.
2. Enter a name and description.
3. For **URL**, enter the URL provided by Glance.
4. For **Method**, select **GET**.
5. For **Execution Mode**, choose **In Browser**.
6. For **CTI Web Services**, choose **Current browser window**.
7. Click **Save**.
## Add the Glance Connector to Five9
1. From the Virtual Contact Center (VCC) Admin Application, under the **Connectors** section, click the plus sign to create a new connector for Glance.
2. Enter a name and description.
3. For **URL**, enter the URL provided by Glance.
4. For **Method**, select **GET**.
5. For **Execution Mode**, choose **In Browser**.
6. For **CTI Web Services**, choose **Current browser window**.
7. Click **Save**.
 ## Joining Glance Sessions from Five9
1. Navigate to the Agent Desktop Application.
2. When logging in, select the skill you associated with Glance.
3. From the Agent Dashboard, select the Campaign where Glance is enabled.
4. When the interaction is started, you will be prompted to sign in to your Identity Provider to access the Glance application. Log in with your credentials.
5. The Glance application is now available and you can join Glance Sessions.
## Joining Glance Sessions from Five9
1. Navigate to the Agent Desktop Application.
2. When logging in, select the skill you associated with Glance.
3. From the Agent Dashboard, select the Campaign where Glance is enabled.
4. When the interaction is started, you will be prompted to sign in to your Identity Provider to access the Glance application. Log in with your credentials.
5. The Glance application is now available and you can join Glance Sessions.
 =================================================================
FILE: /developer/integrations/agent_workspace
=================================================================
This section provides samples for integrating Glance into your agent workspace. The sample package provides an agent-side interface that enables agents to join [Glance Cobrowse](https://help.glance.cx/glance-cobrowse/) and [Mobile Cobrowse](https://help.glance.cx/mobile-app-sharing/) sessions, as well as use [Mobile Camera Share](https://help.glance.cx/mobile-camera/) functionality.
## Getting Started
Before using the Glance agent-side experience, ensure the following prerequisites have been completed:
* The organization has been provisioned a [Glance Group](https://help.glance.cx/account-management/manage_users/).
* Users have been provisioned with valid Partner User IDs.
* The website is tagged with the [Glance Cobrowse script](https://developer.glance.cx/glance-cobrowse/add_tag/), and includes a [button or link](https://developer.glance.cx/glance-cobrowse/create_link/) to start a Cobrowse session.
* [SAML authentication](https://help.glance.cx/integrations/saml/saml_setup/) with Glance is enabled through an Identity Provider.
* Onboarding with Glance Customer Success has been completed. As part of this process, Glance provides an organization-specific URL and configures an allow-list for the agent desktop. If you need assistance, [Contact Glance](https://help.glance.cx/account-management/contact/).
## Agent Interface
=================================================================
FILE: /developer/integrations/agent_workspace
=================================================================
This section provides samples for integrating Glance into your agent workspace. The sample package provides an agent-side interface that enables agents to join [Glance Cobrowse](https://help.glance.cx/glance-cobrowse/) and [Mobile Cobrowse](https://help.glance.cx/mobile-app-sharing/) sessions, as well as use [Mobile Camera Share](https://help.glance.cx/mobile-camera/) functionality.
## Getting Started
Before using the Glance agent-side experience, ensure the following prerequisites have been completed:
* The organization has been provisioned a [Glance Group](https://help.glance.cx/account-management/manage_users/).
* Users have been provisioned with valid Partner User IDs.
* The website is tagged with the [Glance Cobrowse script](https://developer.glance.cx/glance-cobrowse/add_tag/), and includes a [button or link](https://developer.glance.cx/glance-cobrowse/create_link/) to start a Cobrowse session.
* [SAML authentication](https://help.glance.cx/integrations/saml/saml_setup/) with Glance is enabled through an Identity Provider.
* Onboarding with Glance Customer Success has been completed. As part of this process, Glance provides an organization-specific URL and configures an allow-list for the agent desktop. If you need assistance, [Contact Glance](https://help.glance.cx/account-management/contact/).
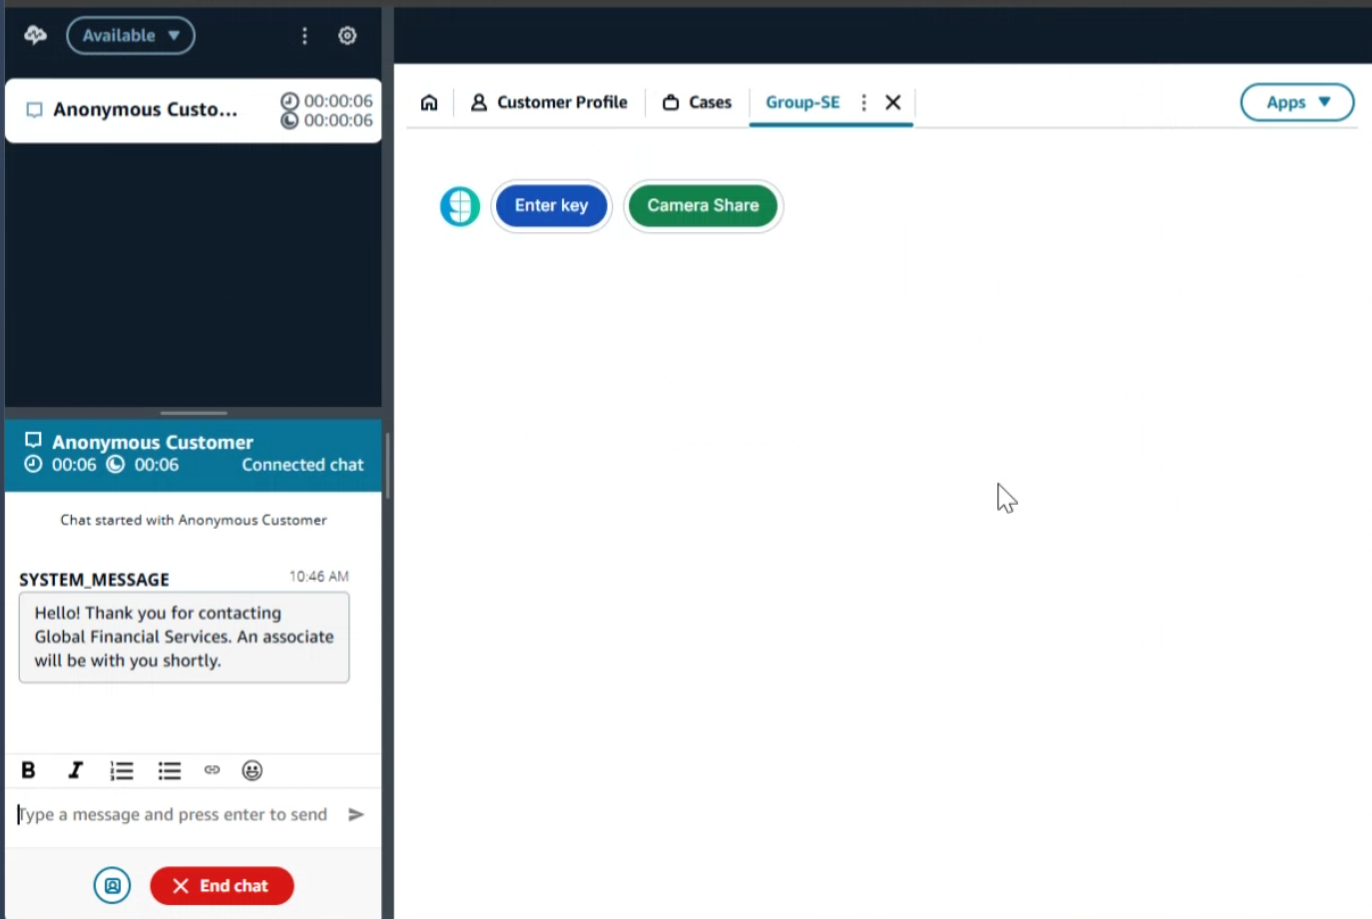
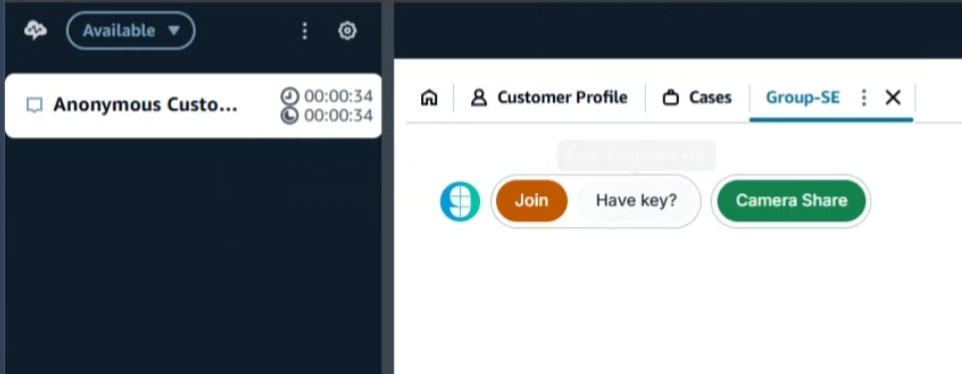
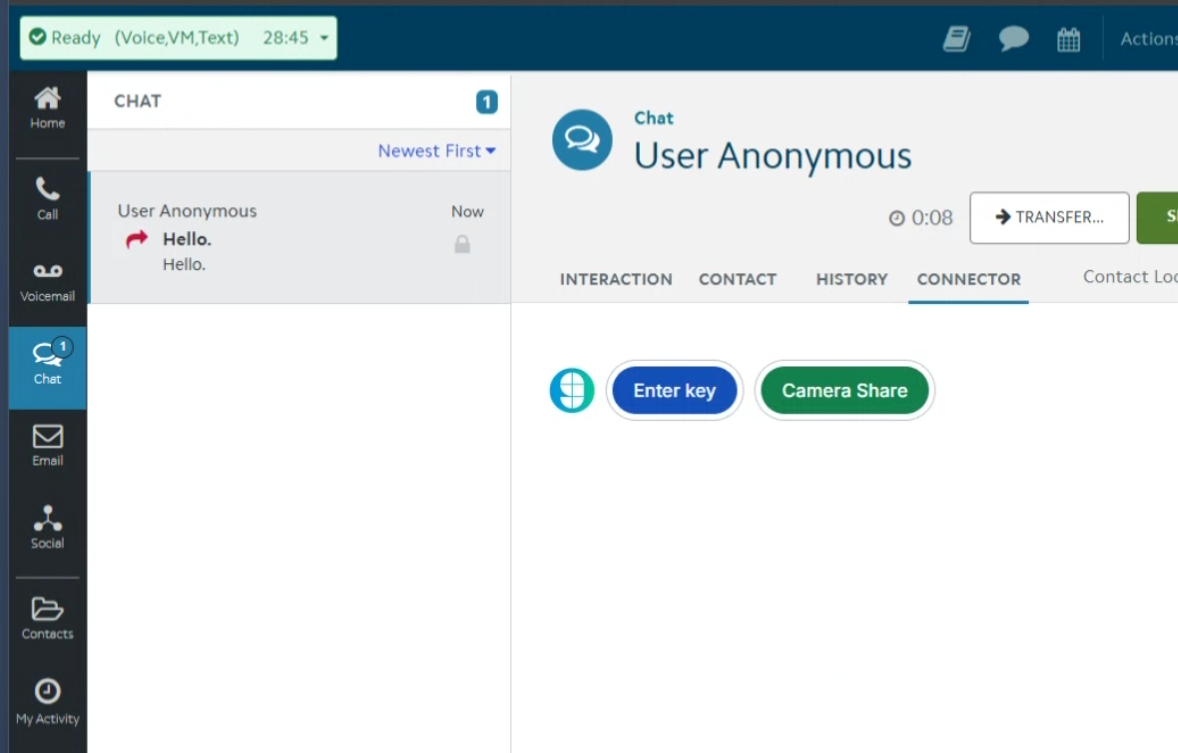
## Agent Interface
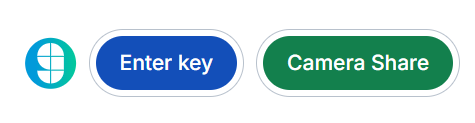 The initial interface offers agents two options for connecting with a visitor: they can click the **Enter Key** button to start a Cobrowse session using a session key provided by the visitor, or click the **Camera Share** button to send an SMS link that allows the visitor to share their mobile phone camera.
### Join with Key
The initial interface offers agents two options for connecting with a visitor: they can click the **Enter Key** button to start a Cobrowse session using a session key provided by the visitor, or click the **Camera Share** button to send an SMS link that allows the visitor to share their mobile phone camera.
### Join with Key
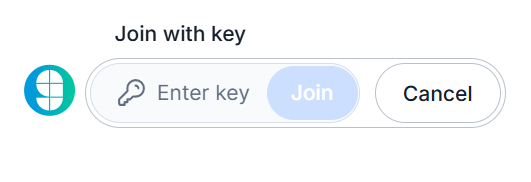 Input the code received from the visitor and click the **Join** button.
### Camera Share
Input the code received from the visitor and click the **Join** button.
### Camera Share
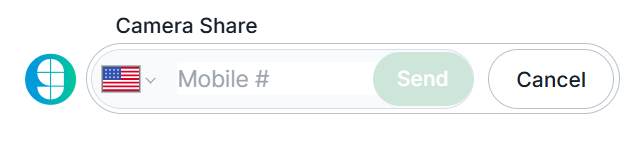 Input the visitor's mobile phone number and click the **Send** button. To change the country code, click the flag icon and select the appropriate region from the list.
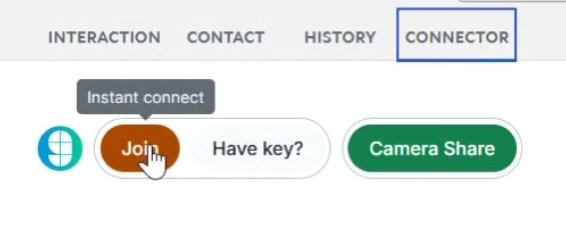
### Presence
Input the visitor's mobile phone number and click the **Send** button. To change the country code, click the flag icon and select the appropriate region from the list.
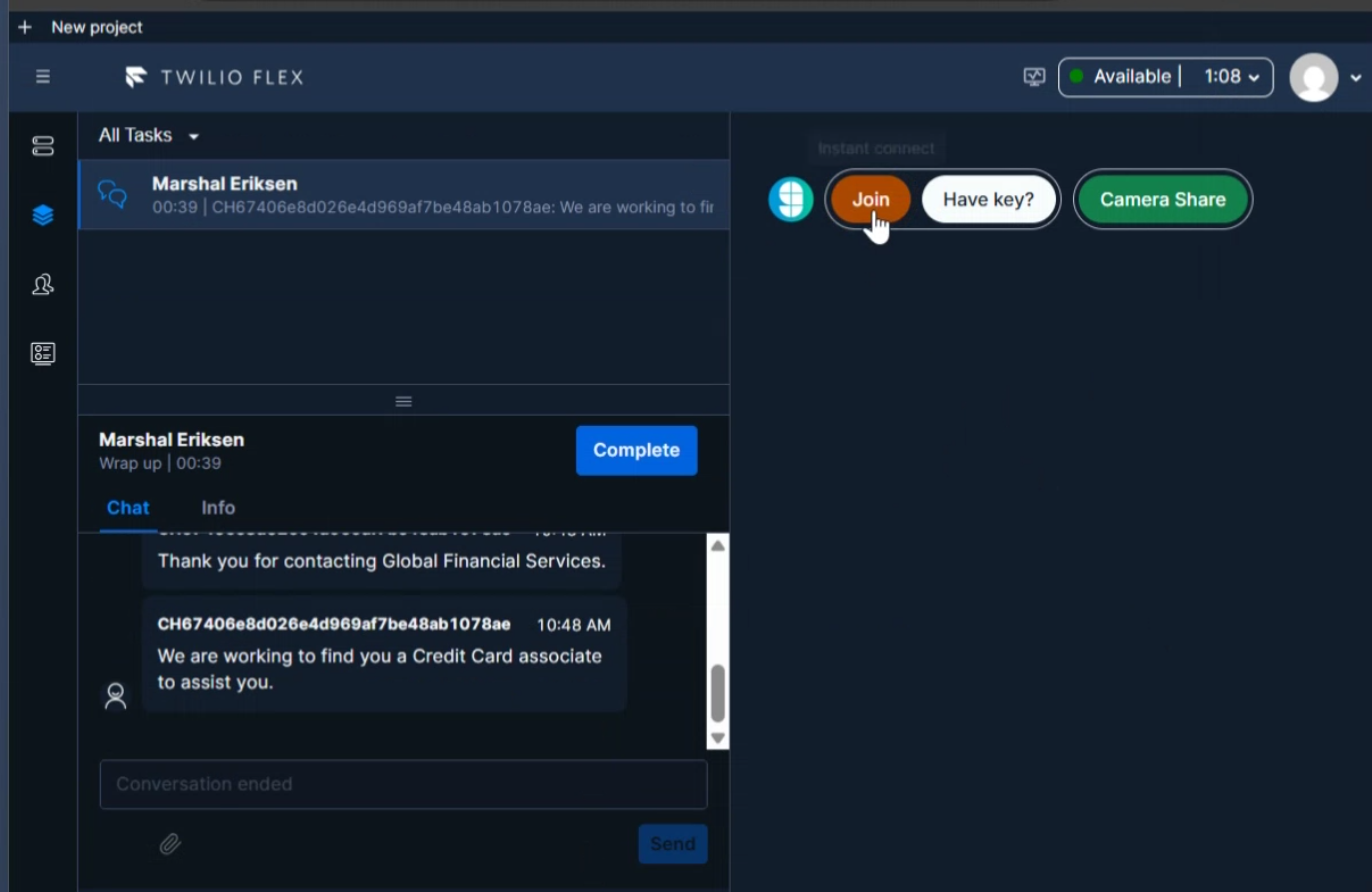
### Presence
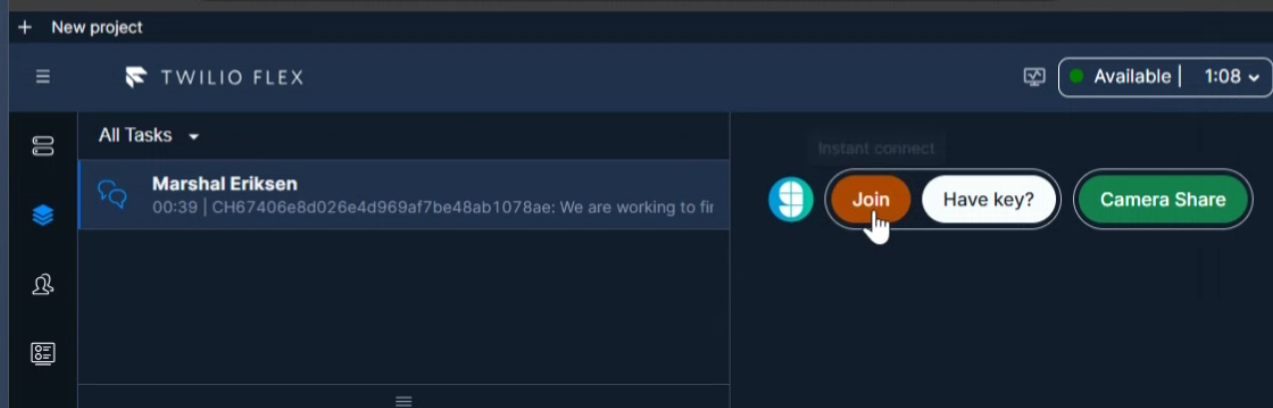
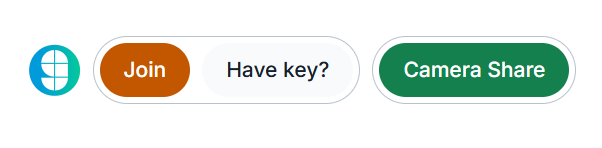 When Presence is enabled, you can instantly join the visitor's session by clicking the orange **Join** button.
=================================================================
FILE: /developer/integrations/agent_workspace/twilio_flex
=================================================================
When Presence is enabled, you can instantly join the visitor's session by clicking the orange **Join** button.
=================================================================
FILE: /developer/integrations/agent_workspace/twilio_flex
=================================================================
 ## Prerequisites
* All high-level prerequisites as listed in the [Getting Started](../agent_workspace/) section.
* Access to a [Twilio Flex Instance](https://www.twilio.com/docs/flex), and have followed the steps to create a [Flex Plugin](https://www.twilio.com/docs/flex/quickstart/getting-started-plugin) through the tutorial.
## Adding Glance to a Flex Plugin
1. After following the tutorial for the Flex Plugin listed above, replace the code in the Bing example with the following code:
```javascript
import React from "react"
import { FlexPlugin } from "@twilio/flex-plugin"
import CustomTaskList from "./components/CustomTaskList/CustomTaskList"
const PLUGIN_NAME = "SamplePlugin"
export default class SamplePlugin extends FlexPlugin {
constructor() {
super(PLUGIN_NAME)
}
/**
* This code is run when your plugin is being started
* Use this to modify any UI components or attach to the actions framework
*
* @param flex { typeof import('@twilio/flex-ui') }
*/
async init(flex, manager) {
flex.CRMContainer.defaultProps.uriCallback = (task) => {
return task
? `URL FROM GLANCE`
: "URL FROM GLANCE"
}
}
}
```
2. [Deploy and release](https://www.twilio.com/docs/flex/quickstart/getting-started-plugin#deploy-your-flex-plugin) the plugin to your environment.
## Joining Glance Sessions from Twilio Flex
1. Navigate to the Twilio Flex Agent desktop.
2. The Glance application is available in the CRM container window.
3. You will be prompted to sign in to your Identity Provider to access the Glance application. Log in with your credentials.
4. The Glance application is now available and you can join Glance Sessions.
## Prerequisites
* All high-level prerequisites as listed in the [Getting Started](../agent_workspace/) section.
* Access to a [Twilio Flex Instance](https://www.twilio.com/docs/flex), and have followed the steps to create a [Flex Plugin](https://www.twilio.com/docs/flex/quickstart/getting-started-plugin) through the tutorial.
## Adding Glance to a Flex Plugin
1. After following the tutorial for the Flex Plugin listed above, replace the code in the Bing example with the following code:
```javascript
import React from "react"
import { FlexPlugin } from "@twilio/flex-plugin"
import CustomTaskList from "./components/CustomTaskList/CustomTaskList"
const PLUGIN_NAME = "SamplePlugin"
export default class SamplePlugin extends FlexPlugin {
constructor() {
super(PLUGIN_NAME)
}
/**
* This code is run when your plugin is being started
* Use this to modify any UI components or attach to the actions framework
*
* @param flex { typeof import('@twilio/flex-ui') }
*/
async init(flex, manager) {
flex.CRMContainer.defaultProps.uriCallback = (task) => {
return task
? `URL FROM GLANCE`
: "URL FROM GLANCE"
}
}
}
```
2. [Deploy and release](https://www.twilio.com/docs/flex/quickstart/getting-started-plugin#deploy-your-flex-plugin) the plugin to your environment.
## Joining Glance Sessions from Twilio Flex
1. Navigate to the Twilio Flex Agent desktop.
2. The Glance application is available in the CRM container window.
3. You will be prompted to sign in to your Identity Provider to access the Glance application. Log in with your credentials.
4. The Glance application is now available and you can join Glance Sessions.
 =================================================================
FILE: /developer/integrations
=================================================================
Glance partners with your integrations team to deliver a seamless transition into your website, CCaaS, or CRM. Many of our customers get started with the Browser Agent SDK and are supported every step of the way by our dedicated Developer Experience (DevEx) team to ensure success.
Glance has a proven track record of integrating with industry-leading platforms, including:
- Salesforce
- Amazon Connect
- Microsoft Dynamics
- Five9
- Twilio Flex
- Genesys
=================================================================
FILE: /developer/integrations/twilio_webchat
=================================================================
Flex WebChat must be loaded from the CDN. Glance does not provide an NPM package, which is required for React deployments.
1. Install [Flex WebChat](https://www.twilio.com/docs/flex/developer/messaging/webchat/setup#option-1).
2. The following code example contains Flex WebChat and Glance Presence functionality. Update the code with your Account SID and Flex Flow SID:
```html
```
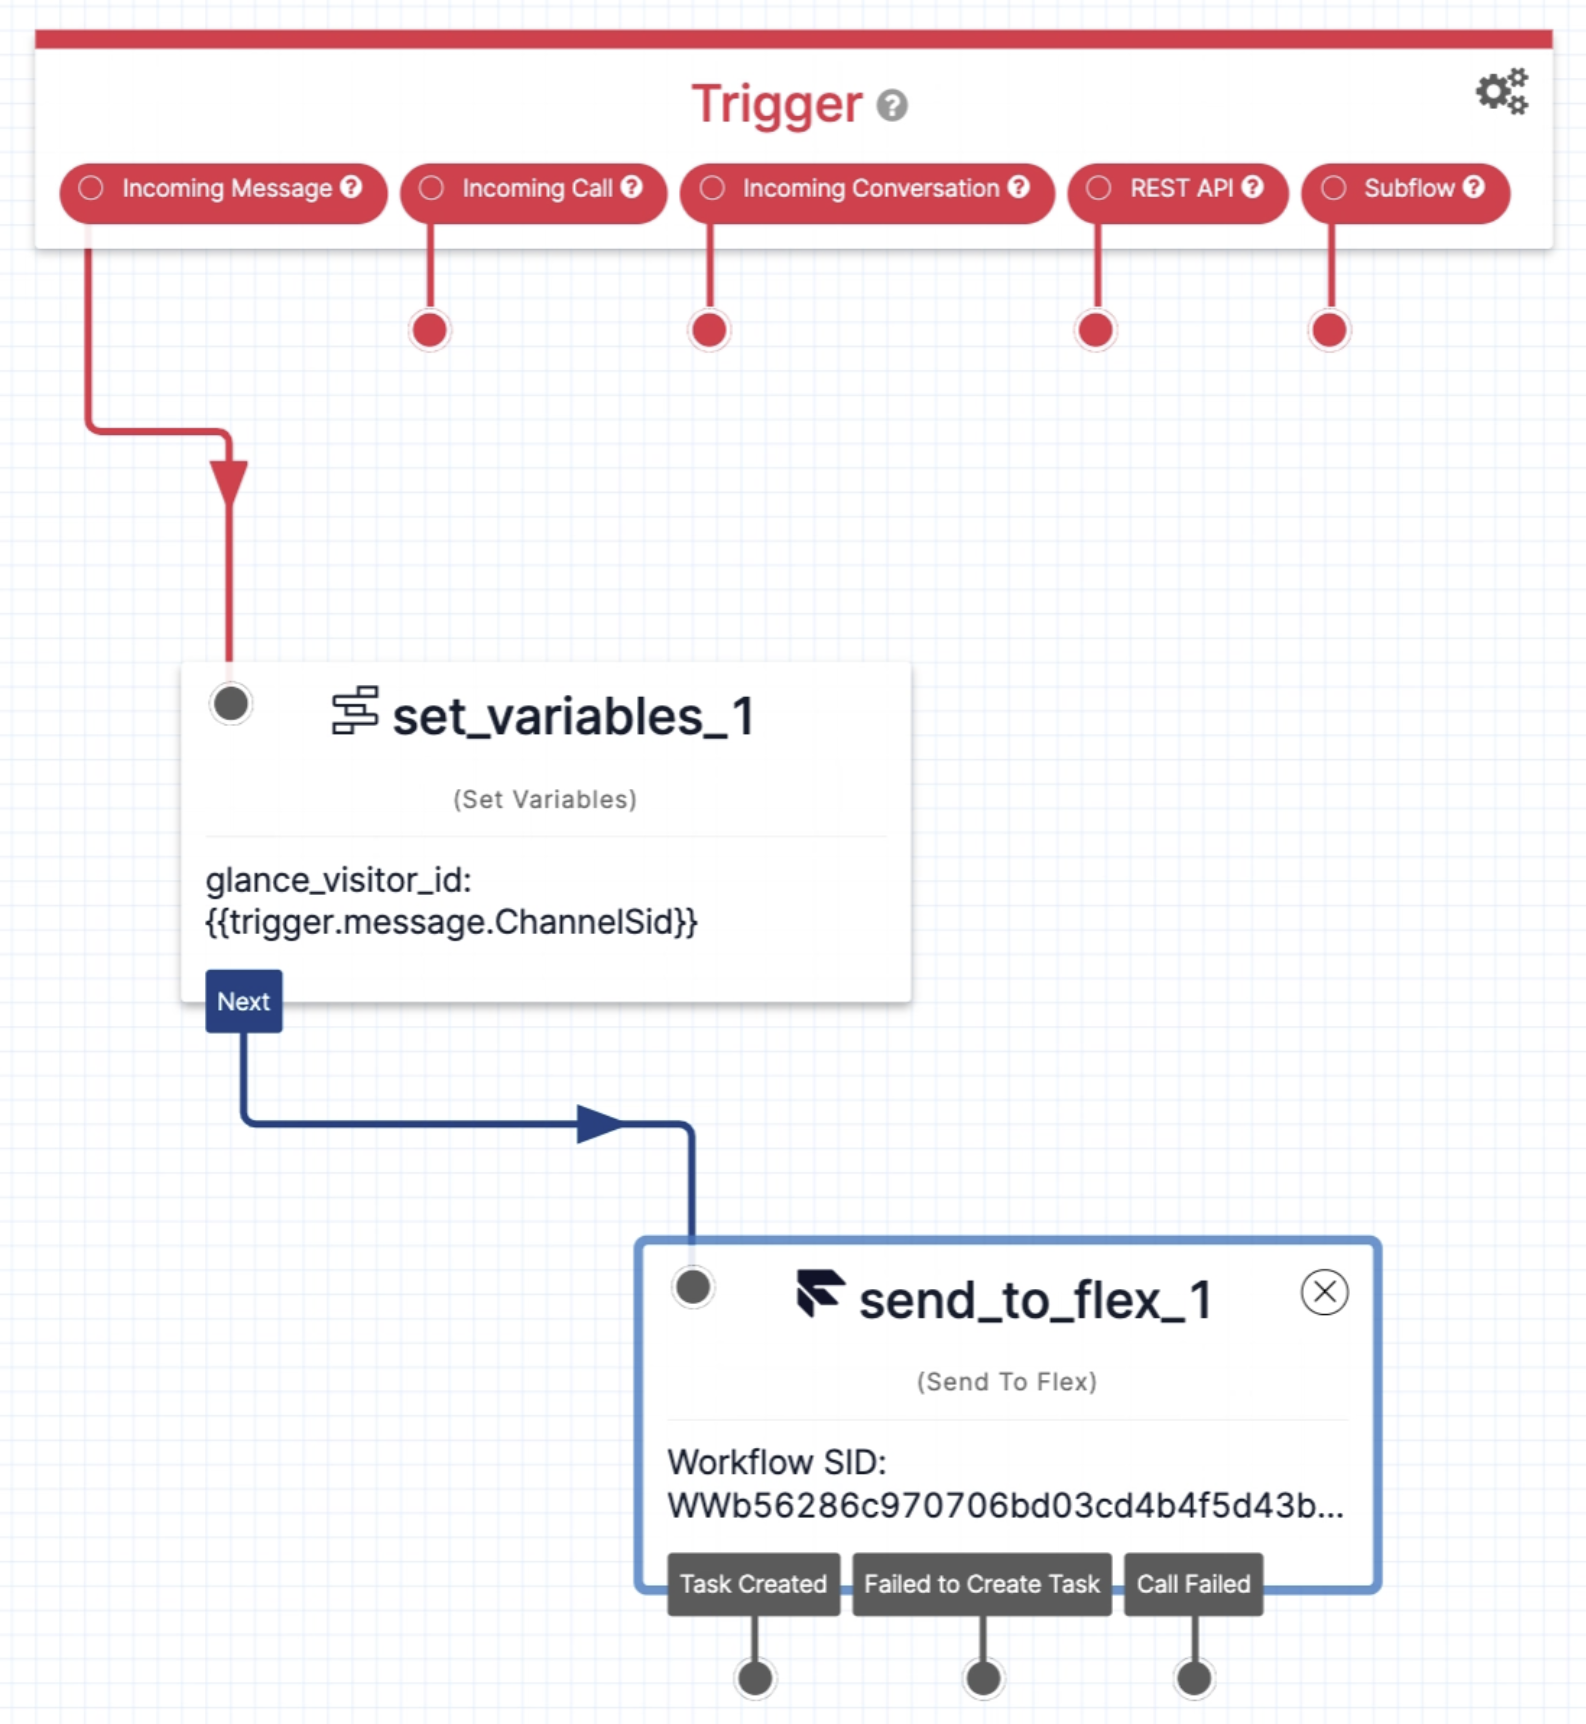
3. Set up a [Flow](https://www.twilio.com/console/studio/flows) for Flex WebChat:
1. From the Twilio Console > **Studio** > **Manage Flows**, select **Webchat Flow**.
2. In the **Widget Library** > **Flow Control**, select and drag **Set Variables** onto the canvas. Click the widget to edit.
3. Click the plus sign on the right side of **Variables**.
4. For **Key**, input `glance_visitor_id`.
5. For **Value**, input `{{trigger.message.ChannelSid}}`
6. **Save** the variable.
7. **Save** the widget.
8. Wire the widget to the **Incoming Message Trigger**.
9. In the **Widget Library** > **Connect Other Products**, select and drag **Send to Flex** onto the canvas. Click the widget to edit.
10. For **Workflow**, select **Assign to Anyone**.
11. For **Channel**, select **Programmable Chat**.
12. For **Attributes**, input `{"name": "{{trigger.message.ChannelAttributes.from}}", "channelType": "{{trigger.message.ChannelAttributes.channel_type}}", "channelSid": "{{trigger.message.ChannelSid}}", "glance_visitor_id": "{{flow.variables.glance_visitor_id}}"}`
13. **Save** the widget.
14. Wire the widget to the **Set Variable Widget** that you just created.
15. Select **Publish**.
=================================================================
FILE: /developer/integrations
=================================================================
Glance partners with your integrations team to deliver a seamless transition into your website, CCaaS, or CRM. Many of our customers get started with the Browser Agent SDK and are supported every step of the way by our dedicated Developer Experience (DevEx) team to ensure success.
Glance has a proven track record of integrating with industry-leading platforms, including:
- Salesforce
- Amazon Connect
- Microsoft Dynamics
- Five9
- Twilio Flex
- Genesys
=================================================================
FILE: /developer/integrations/twilio_webchat
=================================================================
Flex WebChat must be loaded from the CDN. Glance does not provide an NPM package, which is required for React deployments.
1. Install [Flex WebChat](https://www.twilio.com/docs/flex/developer/messaging/webchat/setup#option-1).
2. The following code example contains Flex WebChat and Glance Presence functionality. Update the code with your Account SID and Flex Flow SID:
```html
```
3. Set up a [Flow](https://www.twilio.com/console/studio/flows) for Flex WebChat:
1. From the Twilio Console > **Studio** > **Manage Flows**, select **Webchat Flow**.
2. In the **Widget Library** > **Flow Control**, select and drag **Set Variables** onto the canvas. Click the widget to edit.
3. Click the plus sign on the right side of **Variables**.
4. For **Key**, input `glance_visitor_id`.
5. For **Value**, input `{{trigger.message.ChannelSid}}`
6. **Save** the variable.
7. **Save** the widget.
8. Wire the widget to the **Incoming Message Trigger**.
9. In the **Widget Library** > **Connect Other Products**, select and drag **Send to Flex** onto the canvas. Click the widget to edit.
10. For **Workflow**, select **Assign to Anyone**.
11. For **Channel**, select **Programmable Chat**.
12. For **Attributes**, input `{"name": "{{trigger.message.ChannelAttributes.from}}", "channelType": "{{trigger.message.ChannelAttributes.channel_type}}", "channelSid": "{{trigger.message.ChannelSid}}", "glance_visitor_id": "{{flow.variables.glance_visitor_id}}"}`
13. **Save** the widget.
14. Wire the widget to the **Set Variable Widget** that you just created.
15. Select **Publish**.
 =================================================================
FILE: /developer/legacy_api/activity
=================================================================
The Activity Service API provides developers with programmatic access to historical session data, allowing you to seamlessly query session counts, detailed participant information, and overarching usage metrics. Implemented via Windows Communication Foundation (WCF), this versatile web service supports integration through SOAP/XML, JSON requests, and standard HTTPS POSTs, making it highly compatible with a wide range of backend reporting systems, custom dashboards, and CRM workflows.
In this section, you will find a comprehensive reference for interacting with the Activity Service. This includes a breakdown of all available **Methods** and **Endpoints** (such as retrieving active, completed, or user-specific sessions), the global **Conventions** required for authentication and date formatting, and a detailed mapping of **Session and Guest Statuses** to help you accurately track the lifecycle of every cobrowse, screen share, and video interaction.
=================================================================
FILE: /developer/legacy_api/activity/status
=================================================================
Glance service is provided via Sessions. Each successful session has two or more Session Guests.
=================================================================
FILE: /developer/legacy_api/activity
=================================================================
The Activity Service API provides developers with programmatic access to historical session data, allowing you to seamlessly query session counts, detailed participant information, and overarching usage metrics. Implemented via Windows Communication Foundation (WCF), this versatile web service supports integration through SOAP/XML, JSON requests, and standard HTTPS POSTs, making it highly compatible with a wide range of backend reporting systems, custom dashboards, and CRM workflows.
In this section, you will find a comprehensive reference for interacting with the Activity Service. This includes a breakdown of all available **Methods** and **Endpoints** (such as retrieving active, completed, or user-specific sessions), the global **Conventions** required for authentication and date formatting, and a detailed mapping of **Session and Guest Statuses** to help you accurately track the lifecycle of every cobrowse, screen share, and video interaction.
=================================================================
FILE: /developer/legacy_api/activity/status
=================================================================
Glance service is provided via Sessions. Each successful session has two or more Session Guests.
 ## Session Guest Status
These are possible guest status values:
* **A** - Active (guest connected)
* **C** - Completed (guest has left)
* **D** - Guest declined the session
* **E** - Unexpected error occurred
* **J** - Joining (guest is in process of connecting but has not yet connected)
* **P** - Another viewer instance was opened by the same guest
* **R** - Temporary status that occurs when the server is waiting for a reconnect from the client
* **T** - Session timed out
* **W** - Temporary status that occurs when a different display side has connected but updates are not yet being sent
* **X** - Guest left session, by closing a browser window or dropping the session some other way
=================================================================
FILE: /developer/legacy_api/activity/webservices_activity
=================================================================
This is the API for querying for session counts and session and participant details.
**Endpoint:** `https://www.glance.net/services/activityservice.asmx`
The WSDL is located here: `https://www.glance.net/services/activityservice.asmx?WSDL`
## Session Guest Status
These are possible guest status values:
* **A** - Active (guest connected)
* **C** - Completed (guest has left)
* **D** - Guest declined the session
* **E** - Unexpected error occurred
* **J** - Joining (guest is in process of connecting but has not yet connected)
* **P** - Another viewer instance was opened by the same guest
* **R** - Temporary status that occurs when the server is waiting for a reconnect from the client
* **T** - Session timed out
* **W** - Temporary status that occurs when a different display side has connected but updates are not yet being sent
* **X** - Guest left session, by closing a browser window or dropping the session some other way
=================================================================
FILE: /developer/legacy_api/activity/webservices_activity
=================================================================
This is the API for querying for session counts and session and participant details.
**Endpoint:** `https://www.glance.net/services/activityservice.asmx`
The WSDL is located here: `https://www.glance.net/services/activityservice.asmx?WSDL`
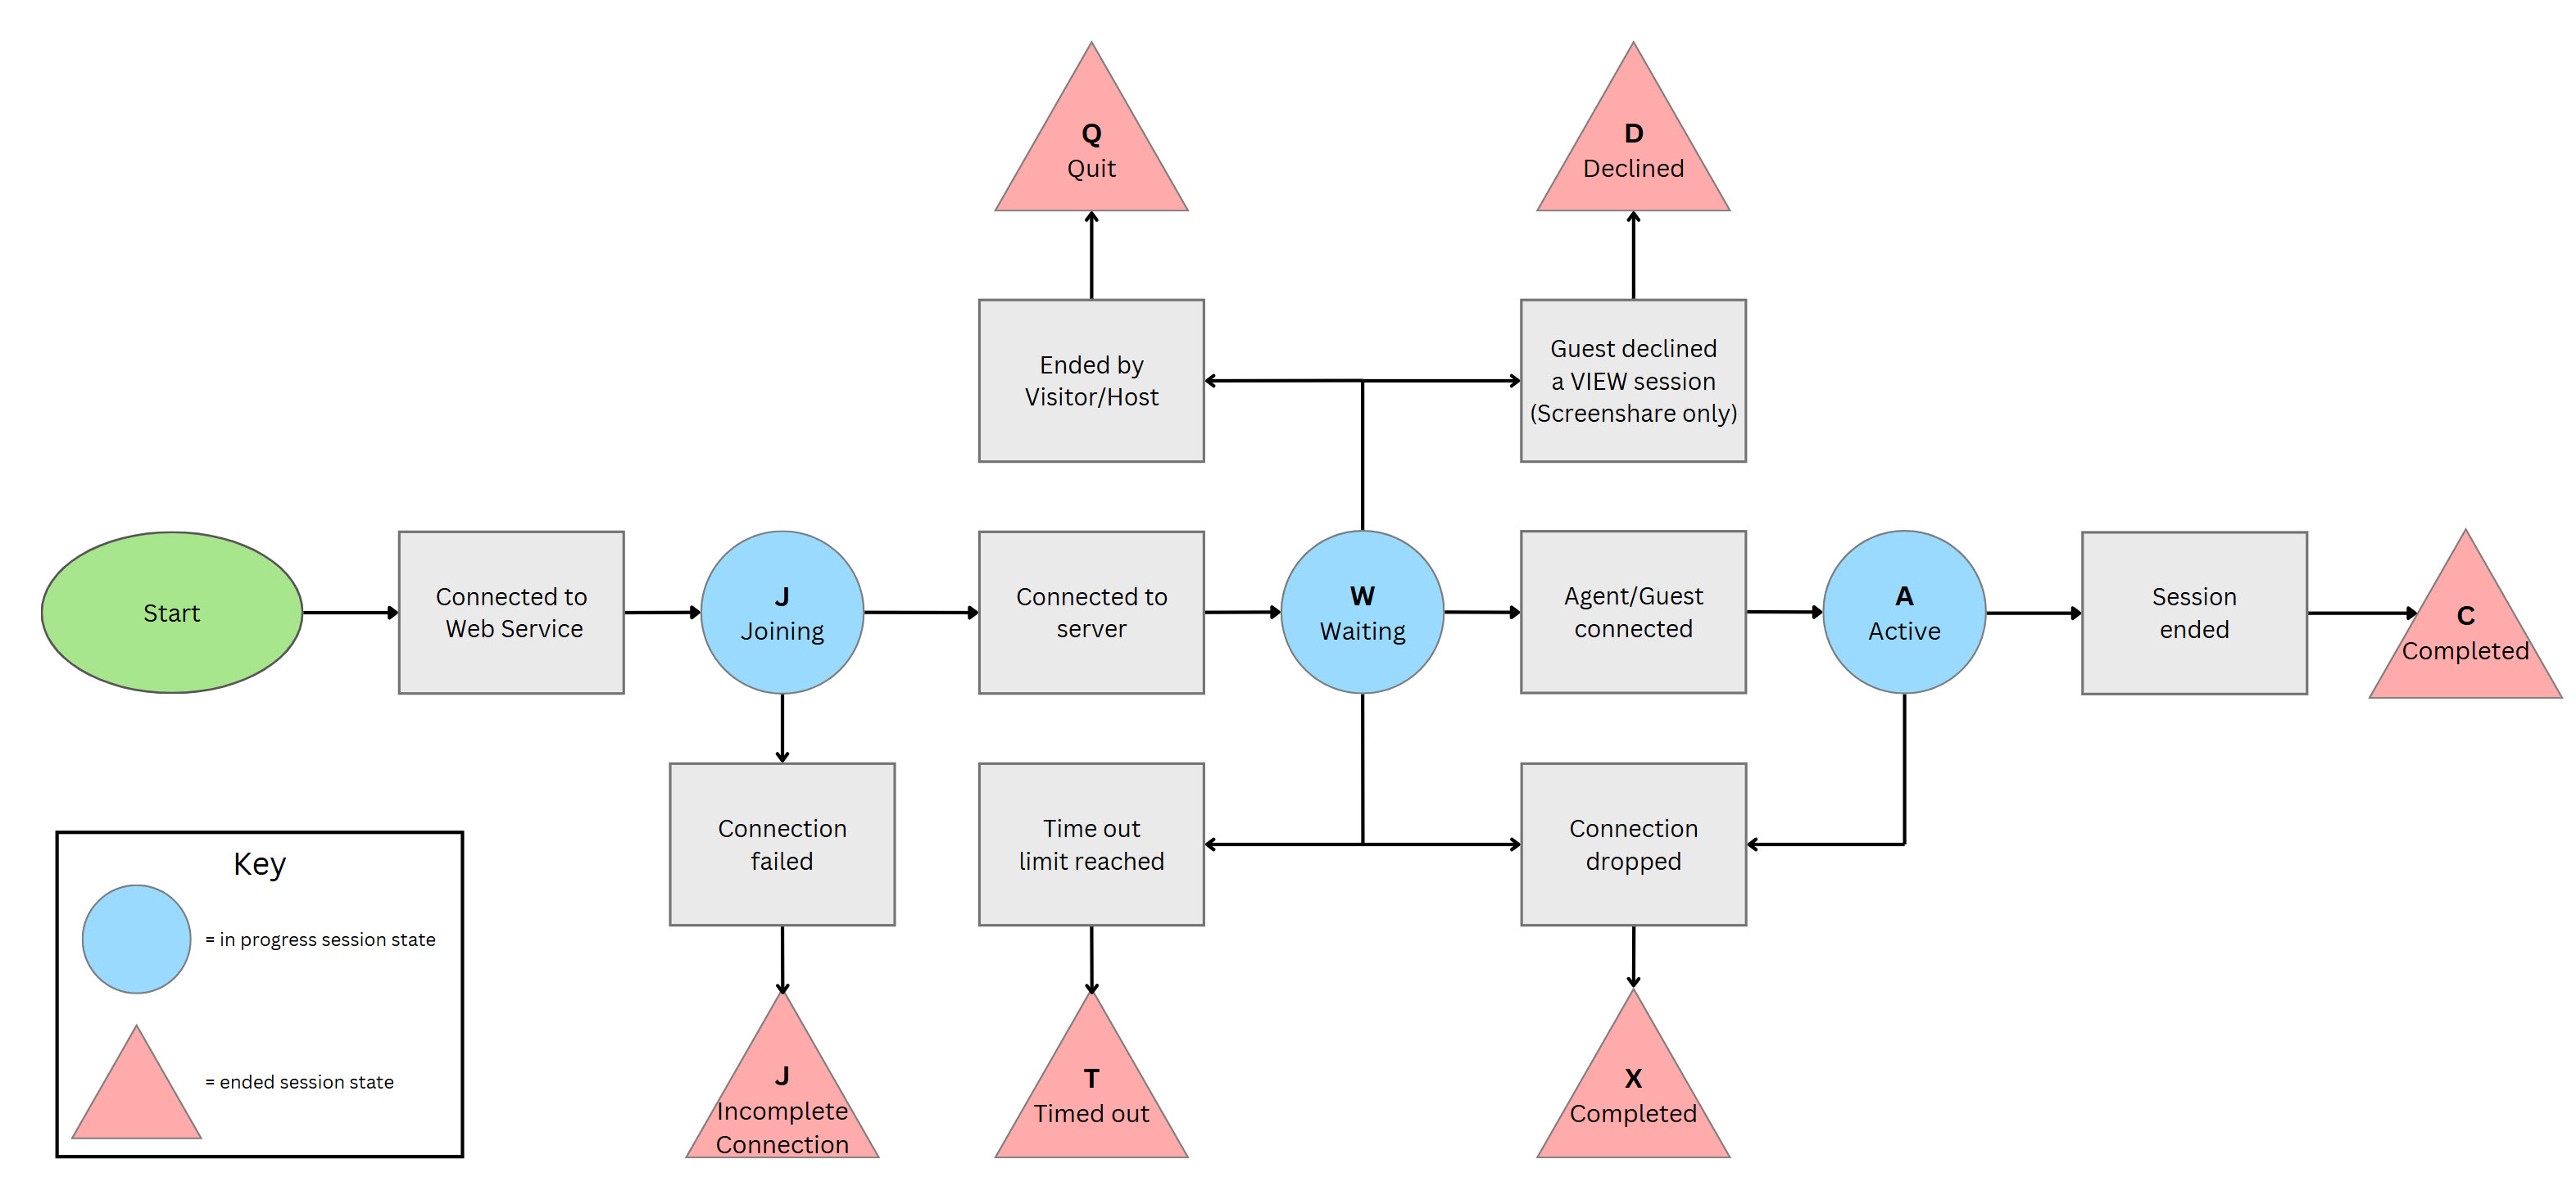
Common session status values are:
- W: Waiting, other side has not joined yet
- A: Active, both sides have joined (host/guest or agent/visitor)
- C: Completed (session has ended)
- X: Session ended but without a clean close (may have dropped)
- T: Timed out. The session was waiting but the other side did not join within the timeout
- Q: Quit. The session was waiting but was ended by the host or visitor before the other side joined
Note: Some API methods filter out sessions with certain status values. Not every method returns sessions with all these status values. | | **Width and Height** | The initial width and height of the screen are returned for a screen-sharing session. This can change during a session if the display side changes its monitor or resolution. These values are 0 for co-browsing sessions.
For video sessions, the width and height represent the video resolution. The exact resolution depends on the originating person's webcam make, model, and settings. Video sessions always have a fixed ratio of 4:3 (NTSC), 11:9 (PAL), or less commonly 5:4 or 16:9 (HD) and usually have one of these sets of dimensions:
- 160x120
- 176x144
- 320x240
- 352x288
- 640x360
A larger video resolution�such as 640x480 or 704x576�usually means the webcam is misconfigured. | | **Session Duration** | Session duration is in seconds. It is 0 for active sessions. | | **Guest Type** | Guest type is one of:
- Agent: Agent (Glance user) in a Cobrowse session
- Visitor: Website visitor (customer) in a Cobrowse session
- Host: Glance user who has started a screen-sharing session
- Guest: Guest of a screen-sharing session
- J: Joining (the guest is in the process of connecting but has not yet connected)
- A: Active (guest connected)
- C: Completed (guest has left)
- X: Guest left the session, but without a clean close (may have dropped)
See [Session Status and Session Guest Status](./status) for more details. | | **Guest Duration** | Guest duration is in seconds. It is 0 for active guests. | | **Guest Information** | Guest information may include name, email, and phone if supplied. These values can be requested from the guest or passed through a URL used to join the session. Glance gathers this information on behalf of Glance customers and only at their request. If a customer account is not configured to gather this information, these values are empty.
Guest information may also include a location node with city, region (state/province), and country code. This is derived from the guest's IP address if available. | ### Sample Session Records (XML) ```xml
- 2012-12-01T16:08:00Z: UTC date and time
- 2012-12-01T16:08:00-5:00: Time with offset from UTC
- 2012-12-01T16:00:00: Unspecified timezone = US East Coast time (EST or EDT)
- 2012-12-01: Time 00:00, midnight at the beginning of Dec 1, 2012, East Coast time
Note: Date values are returned in [UTC](https://en.wikipedia.org/wiki/Coordinated_Universal_Time). | ================================================================= FILE: /developer/legacy_api/activity/webservices_operations ================================================================= ## PartnerSessionCounts `https://www.glance.net/services/activityservice.asmx?op=PartnerSessionCounts` This method returns counts of numbers of sessions started within the given date range, broken down by session type and status. **Input Parameters** | Parameter | Description | | :--- | :--- | | **partnerId** | Your Glance group id. This is assigned by Glance. | | **apiKey** | The unique identifier used to authenticate. Administrators can set, reset, and view API keys from the My Account area under Settings. | | **type** | Parameter must be supplied, but value is optional. **"C"** Cobrowse, **"G"** Screen Share, or **"V"** Video (blank returns all). | | **status** | **"A"** Active or **"C"** Completed sessions. | | **startRange**
**endRange** | Date range of session starting times.
For today's sessions, set startRange to today and endRange to tomorrow.
The maximum range is 31 days. | **Sample Results** ```xml
**endRange** | Date range of session starting times.
For today's sessions, set startRange to today and endRange to tomorrow.
The maximum range is 31 days. | **Sample Results** ```xml
**endRange** | Date range of session starting times.
For today's sessions, set startRange to today and endRange to tomorrow.
The maximum range is 31 days. | | **sessionKey** | Parameter must be supplied, but value is optional. If supplied, then only sessions with that key are returned. | | **nResults** | Number of sessions to return in this call, must be between 1 and 1000. | | **nextId** | Next starting id for pagination of results. For the first (or a single) call pass 0. On subsequent calls, pass the value returned by the previous call. | **Sample Results** ```xml
**endRange** | Date range of session starting times.
For today's sessions, set startRange to today and endRange to tomorrow.
The maximum range is 31 days. | | **status** | Must be either "A" to return Active (in-progress) sessions or "C" for Completed sessions. | | **sessionKey** | Parameter must be supplied, but value is optional. If supplied, then only sessions with that key are returned. |
partnerUserId can be assigned by Glance, but will typically be supplied by you, if you provision users with the Glance Provisioning API. For more information on provisioning, contact Glance support.
**connfail** - Failed to establish or maintain the websocket connection. In the event of a connection failure, a "detail" property will include a detailed reason:
**authfail** - Authorization token missing, bad, or expired
**connection** - Network connection dropped
**error** - Server returned an error
**invalidprotocol** - Visitor IDs contain special nats characters: space, *, and >. | | `onterms` | `{ status : "displayed/accepted/declined" }` | The terms event fires when the terms and conditions dialog is displayed, accepted, or declined by the visitor. | | `onvisitorsessionstart`, `onvisitorsessionend`, `onvisitorerror` | *N/A* | These events fire when the corresponding events sessionstart, sessionend, and error fire on the visitor side. See the `GLANCE.Cobrowse.Visitor` API documentation for details. | | `onvisibility` | `{ visibility : "hidden/visible" }` | The visibility event fires when the visitor's browser tab visibility changes. | --- ### Error Handling The `onfail` parameters to `GLANCE.Presence.Agent` methods should be a function which takes a "reason" parameter. The "reason" codes will be one of the following: * **authorization** - Authorization token missing, bad, or expired * **connection** - Network connection could not be established. See the browser console for details. ## Sample Code See [Sample Code](./sample) for details. ================================================================= FILE: /developer/presence/presence_rest_api ================================================================= # Presence Agent REST API The Glance Presence Agent REST API offers the same functionality as the JavaScript `GLANCE.Presence.Agent` API, with the exception of `connect()` which relies on WebSockets. The REST API is useful for implementing server side agent console functionality. ### REST API URLs The Presence service consists of a load balancer at `presence.glance.net` as well as multiple named Presence Servers at `presence0001.glance.net`, `presence0002.glance.net`, etc. Presence data can be queried by invoking the JSON REST API on the Presence Service at `presence.glance.net`. Signaling specific visitors must be done by finding the instance that the visitor is currently connected to (via `/findvisitor`), then invoking the REST API on that specific server. ### Authorization All Presence Agent REST API entry points expect an authorization token to be sent in an HTTP `Authorization` header as follows: ```text Authorization: Bearer [authorization_token] ``` The Authorization Token can be obtained using the Glance [Authorization API](/webservices/auth/webservices_authorization). *** ### REST API Endpoints The Presence service supports the following REST endpoints: #### /lookupvisitor Returns the Presence information for a particular visitor. ```text GET [https://presence.glance.net/lookupvisitor?groupid=](https://presence.glance.net/lookupvisitor?groupid=)[groupid]&visitorid=[visitorid] ``` **Response:** ```json { "direct": "pr0016.glance.net:443", "visitorpresent": "1583953702.0", "timestamp": "1583953702.0", "visitorid": "example", "groupid": "12345", "ds": "pr0016.glance.net/0", "directserver": "pr0016.glance.net", "tlsport": 5501, "httpsport": 443 } ``` #### /findvisitor Returns the specific named Presence server that the visitor is currently connected to. ```text GET [https://presence.glance.net/findvisitor?groupid=](https://presence.glance.net/findvisitor?groupid=)[groupid]&visitorid=[visitorid] ``` **Response (Visitor Found):** ```json { "ds": "pr0016.glance.net/0", "direct": "pr0016.glance.net:443", "directserver": "pr0016.glance.net", "tlsport": 5501, "httpsport": 443, "visitorfound": true } ``` **Response (Visitor Not Found):** ```json { "visitorfound": false } ``` #### /signalvisitor Signals the specified visitor, passing a JSON message. There must be a connected `GLANCE.Presence.Visitor` instance on the visitor side to receive the signal. ```text POST https://[directserver]/signalvisitor?groupid=[groupid]&visitorid=[visitorid] ``` The body of the request is the JSON message to send. The message should have the following format: ```json { "mtype": "message_type", "data": "message_payload" } ``` The message type can be `"invoke"`, to invoke a `GLANCE` JavaScript function on the visitor: ```json { "mtype": "invoke", "data": { "func": "GLANCE.Cobrowse.Visitor.startSession" } } ``` Alternatively, message type `"signal"` can be specified to send a custom message. When the visitor side receives the message, the event handler `onsignal()`, if defined, will be called on the Visitor instance. For example: ```json { "mtype": "signal", "data": { "command": "startchat", "chatid": "56789" } } ``` This will result in `onsignal({ "command": "startchat", "chatid": "56789" })` being called on the `GLANCE.Presence.Visitor` instance. ================================================================= FILE: /developer/presence/presence_security ================================================================= The Presence Service allows an authorized agent to invoke JavaScript functionality in a visitor browser. This document outlines the security considerations associated with the Presence Service. When an agent issues a request to the Glance Presence Service, the service verifies the identity of the agent, and ensures that particular agent is authorized to carry out the requested operation. This verification is accomplished by means of an Authorization Token. ## Authorization Token All agent side requests to the Presence Service carry an Authorization Token which can be obtained from the Glance Web Service. Glance uses the JSON Web Token (JWT) standard for creating, signing, and verifying authorization tokens. ## Obtaining the Token For an Agent to obtain an authorization token for Presence: 1. The Agent passes credentials to the Glance Authorization Service to prove their identity. 2. The Glance Authorization Service verifies the agent's credentials and determines whether the Agent is authorized to access the Presence service. The Glance Authorization Service is accessible via: * Soap 1.2 ([wsdl](https://www.glance.net/services/AuthorizationService.svc?wsdl)) * JSON REST ([REST help page](https://www.glance.net/services/AuthorizationService.svc/rest/help)) * XML REST ## Authentication The Glance Authorization service accepts as credentials any of the following: * Glance username and password * Partner ID, partner user ID, and login key * Glance username and login key * Glance website session id In addition to credentials, the agent must specify a Glance group id. An individual user may be a member of multiple groups, but at any given time the user authenticates in a particular group. If an agent needs to carry out operations in multiple groups, they must obtain multiple authorization tokens. ## Authorization Agents must have a current subscription which includes the Presence feature in order to be granted access to Presence services. ## Token Duration The agent specifies a duration for the token. Tokens may be issued for up to two hours duration. Obtaining a token is resource intensive. Therefore, the agent console should obtain a token and reuse it until it expires or the agent logs out, rather than obtaining a new token for every operation. ## Token Storage and Usage The authorization token may be obtained server side using the SOAP or REST API. It may be stored server side, for example in session state, and used in subsequent server side requests to the Presence service. Alternatively, a token obtained server side may be used client side by the Presence JavaScript API. The token may be embedded in the page in a `data-authtoken` attribute of the cobrowse script or meta tag, or it may be passed into the JavaScript API using `GLANCE.Authorization.setToken()`. Finally, a token may be obtained client side by passing credentials into `GLANCE.Authorization.authorize()`. When `setToken()` or `authorize()` is used, the authorization token is stored in local storage to allow reuse. All calls to the `GLANCE.Presence` API will automatically use the stored token, as long as those calls are made from secure pages on the same fully qualified domain. See the [Glance Authorization API](/webservices/auth/webservices_authorization) documentation for more information. --- ## Presence Service Request Validation ### Validating Authorization Token The Presence Service validates the authorization token presented: * In the `Authorization` header, for REST requests. * In the first message on a websocket connection. The Presence Service verifies the token signature, that it is not expired, and that the `groupid` in the token matches the `groupid` in the request. There are no restrictions on which visitors in the group the agent can interact with. ### Origin Check and CORS Requests to the Presence Service from secure browsers will include an `Origin` header. The Presence Service will reject requests with a non-whitelisted Origin domain. If and only if the request Origin is on the whitelist, the Presence Service will respond with the `Access-Control-Allow-Origin` header set to the Origin domain. ### Shared Secret JSON Web Tokens require a shared secret between the token issuer and the consumer. The Presence service generates a new shared secret every two hours and passes it to the Glance Authorization service via an https request to an internal endpoint in the Glance VPN. ### Visitor Authentication Website visitors are identified by a unique visitor id, which may be anything unique to the visitor such as a user id, phone number, or email address, which could either be relayed to a customer service agent over the phone, or is included in a customer record that can be retrieved using some information that is relayed over the phone. When the visitor id is not secret or is static, a customer service agent may want some way to guarantee that the visitor browser receiving any presence requests is truly operated by the individual on the phone. One way to do this would be for the agent console to trigger a confirmation message to appear on the visitor side. The visitor must select the correct button on the confirmation message (as directed by the agent over the phone) before subsequent presence requests can be sent. It is still the responsibility of the agent to verify the identity of the caller. ================================================================= FILE: /developer/presence/presence_visitor ================================================================= ## Adding Visitor Presence to Your Website There are two ways to include Visitor Presence functionality in your website. You can get default Presence behavior by adding some parameters to your Cobrowse script tag, or you can load and use the Presence API for more control. ### Visitor ID A unique `visitorid` is required when connecting to presence. The visitorid can be specified in the `GLANCE_COBROWSE` JavaScript variable, or in `data-` attributes, as described on the [Cobrowse Visitor API](/webservices/visitor_agent/visitor/#cobrowse-visitor-api) page. For example: ```html ``` --- #### GLANCE.Presence.Visitor(params) - Constructor Constructor for a Visitor Object. **Parameters** ```javascript { "groupid" : "group_id", // defaults to GLANCE_COBROWSE.groupid "visitorid" : "visitor_id" // defaults to GLANCE_COBROWSE.visitorid } ``` Do not specify a `visitorid` if the visitor will connect using `connectUnique()`. See this page for more information on [Glance Cobrowse](/webservices/visitor_agent/visitor/#glance_cobrowse). --- #### GLANCE.Presence.Visitor.prototype.presence(params) Sends Presence information to the Presence service. **Parameters** ```javascript { "data": "custom data to be stored on the presence server" // optional } ```
setVisitorId, the initial value of visitor id on page load can not be null. If the value of the visitor id on page load is not known, use a placeholder value and then change it with setVisitorID at a later date.
origin and xid may be up to 255 Latin-1 (ISO/IEC 8859-1) characters. For character type and length limits on name, email, and phone see this page.
allow="camera *; microphone *"
insession() without parameters is possible but is not supported. Currently, this will return an array of sessions that the agent is participating in, but this functionality should not be relied on and will be separated into a different method in a future release.
[groupid] in the above URLs must be replaced with your Group ID.
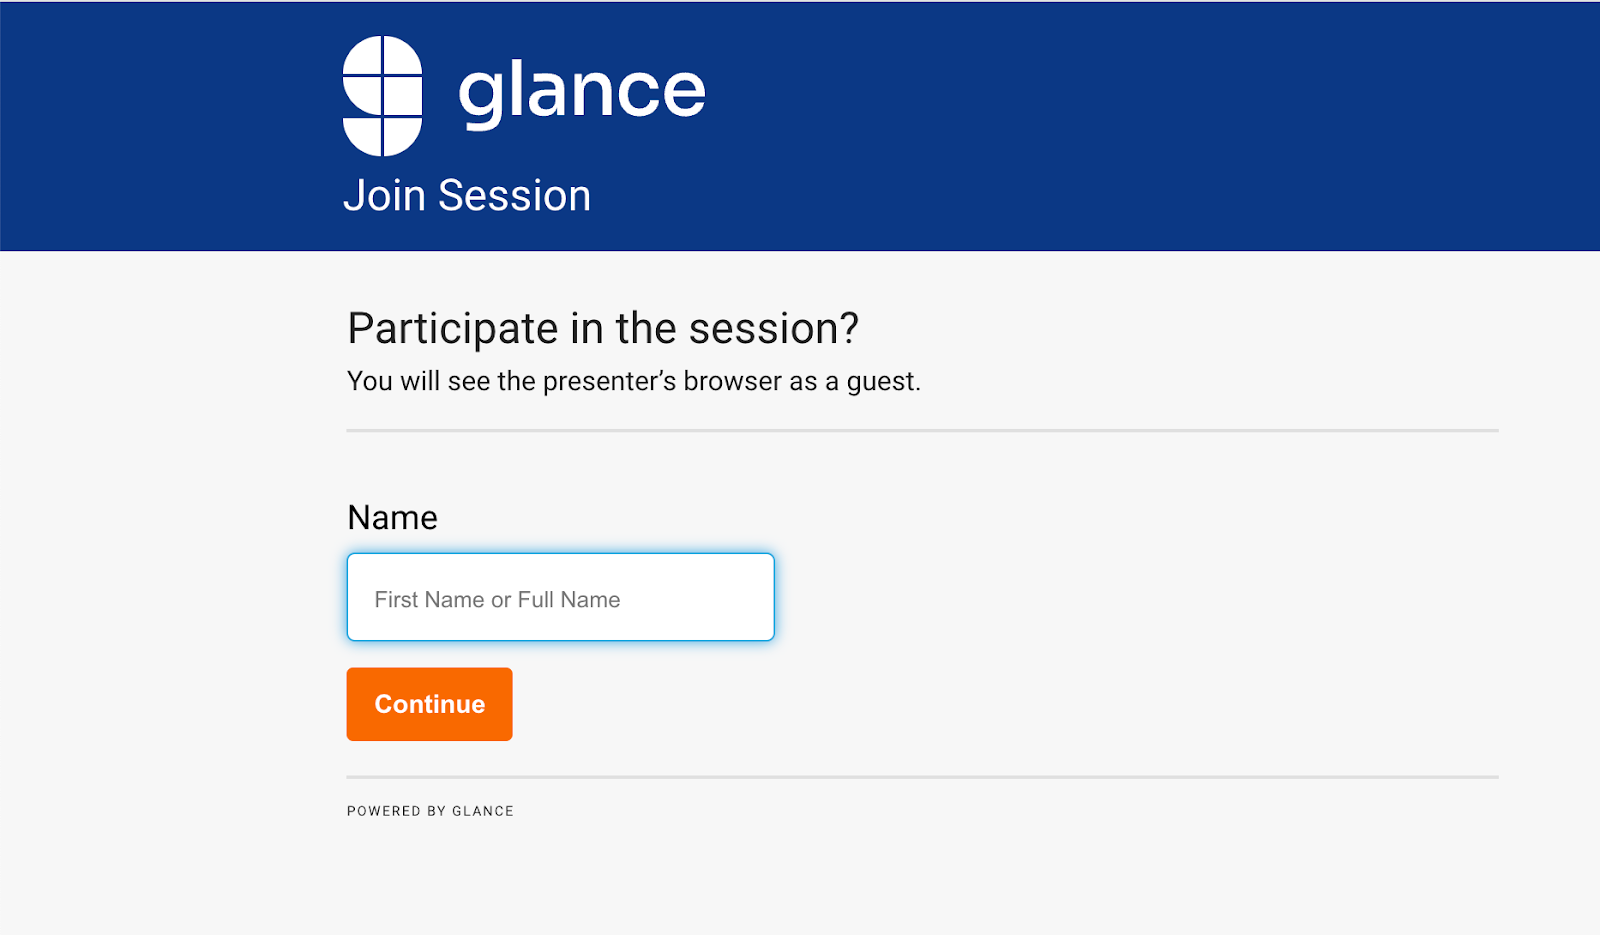 It contains one form field and one button. When the guest clicks **Continue**, your page will run code similar to the following, leveraging the Glance SDK in various places:
```javascript
async function getJoinCode() {
// define the guest's name, or use the generic "Guest" if the field is blank
var guestName = document.querySelector("#GuestName").value
? document.querySelector("#GuestName").value
: "Guest";
// Show or hide UI as appropriate, for example:
$("#headermessagetext").hide();
$("#guestname").hide();
$("#waitingtext").show();
$("#joincode").show();
let connector = new GLANCE.Guest.Connector({
groupid: groupid, // Make sure to replace with your unique group id
ws: "www.glance.net",
});
connector.addEventListener("timeout", () => {
// Perform functions/adjust UI in the event that the agent fails to admit the guest before the code times out
});
connector.addEventListener("error", () => {
// Perform functions/adjust UI in the event of an error
});
let guestcode = await connector.connect(guestName);
if (!guestcode.ok) {
// Perform functions/adjust UI in the event of an error
} else {
// guestcode.code contains the code to be displayed to the user. Adjust the UI and display it to the user.
// guestcode.timeout indicates the number of seconds until the code will timeout.
// You may optionally use this to extend the timeout, possibly in response to a user prompt if desired.
}
}
```
It contains one form field and one button. When the guest clicks **Continue**, your page will run code similar to the following, leveraging the Glance SDK in various places:
```javascript
async function getJoinCode() {
// define the guest's name, or use the generic "Guest" if the field is blank
var guestName = document.querySelector("#GuestName").value
? document.querySelector("#GuestName").value
: "Guest";
// Show or hide UI as appropriate, for example:
$("#headermessagetext").hide();
$("#guestname").hide();
$("#waitingtext").show();
$("#joincode").show();
let connector = new GLANCE.Guest.Connector({
groupid: groupid, // Make sure to replace with your unique group id
ws: "www.glance.net",
});
connector.addEventListener("timeout", () => {
// Perform functions/adjust UI in the event that the agent fails to admit the guest before the code times out
});
connector.addEventListener("error", () => {
// Perform functions/adjust UI in the event of an error
});
let guestcode = await connector.connect(guestName);
if (!guestcode.ok) {
// Perform functions/adjust UI in the event of an error
} else {
// guestcode.code contains the code to be displayed to the user. Adjust the UI and display it to the user.
// guestcode.timeout indicates the number of seconds until the code will timeout.
// You may optionally use this to extend the timeout, possibly in response to a user prompt if desired.
}
}
```
 When the agent admits the guest successfully, the guest's browser will automatically be redirected to the **Guest Viewer** page (hosted on glance.net) so this event does not need to be handled explicitly.
After the session, the guest is redirected to a URL that can be specified in the **Account Management** area of glance.net.
Refer to the [Glance Guest API Reference Document](https://glance.gitlab.io/glance-client-src/GLANCE.Guest.html) for a breakdown of the events, parameters, and additional functionality available.
=================================================================
FILE: /developer/sdk
=================================================================
The Glance SDK suite provides developers with the tools needed to embed seamless, real-time collaboration directly into any platform. Whether you are building a custom agent desktop, integrating into a native mobile app, or creating a frictionless join experience for your customers, our SDKs offer flexible, out-of-the-box components and granular API controls.
Choose the SDK that fits your implementation:
{% launcher %}
{% card
title="Browser Agent SDK"
description="Embed the Glance Agent experience directly into your web-based CRM, CCaaS, or custom support portal."
href="/sdk/browser-agent/"
icon="🌐"
/%}
{% card
title="Mobile SDK"
description="Integrate cobrowse, screen sharing, and masking natively into your iOS and Android applications."
href="/sdk/mobile/"
icon="📱"
/%}
{% card
title="Guest Join SDK"
description="Create frictionless, one-click session join experiences for your customers directly in the browser."
href="/sdk/guest-join/"
icon="🤝"
/%}
{% /launcher %}
## Choosing the Right SDK
* **Building for the Agent:** If you are a developer tasked with integrating the Glance agent viewer into tools like Salesforce, Zendesk, Genesys, or your own proprietary web dashboard, you will want the **Browser Agent SDK**.
* **Building for the App User:** If you need to allow customers to share their mobile app screen with your support team, use the **Mobile SDK** (available for iOS and Android).
* **Building for the Web User:** If you want to dynamically launch sessions for customers visiting your website without requiring them to download anything, the **Guest Join SDK** is your go-to.
=================================================================
FILE: /developer/sdk/mobile_sdk/flows
=================================================================
The following flowcharts illustrate Glance's operations when using the mobile SDK.
## Initialize Glance and Join a Session
When the agent admits the guest successfully, the guest's browser will automatically be redirected to the **Guest Viewer** page (hosted on glance.net) so this event does not need to be handled explicitly.
After the session, the guest is redirected to a URL that can be specified in the **Account Management** area of glance.net.
Refer to the [Glance Guest API Reference Document](https://glance.gitlab.io/glance-client-src/GLANCE.Guest.html) for a breakdown of the events, parameters, and additional functionality available.
=================================================================
FILE: /developer/sdk
=================================================================
The Glance SDK suite provides developers with the tools needed to embed seamless, real-time collaboration directly into any platform. Whether you are building a custom agent desktop, integrating into a native mobile app, or creating a frictionless join experience for your customers, our SDKs offer flexible, out-of-the-box components and granular API controls.
Choose the SDK that fits your implementation:
{% launcher %}
{% card
title="Browser Agent SDK"
description="Embed the Glance Agent experience directly into your web-based CRM, CCaaS, or custom support portal."
href="/sdk/browser-agent/"
icon="🌐"
/%}
{% card
title="Mobile SDK"
description="Integrate cobrowse, screen sharing, and masking natively into your iOS and Android applications."
href="/sdk/mobile/"
icon="📱"
/%}
{% card
title="Guest Join SDK"
description="Create frictionless, one-click session join experiences for your customers directly in the browser."
href="/sdk/guest-join/"
icon="🤝"
/%}
{% /launcher %}
## Choosing the Right SDK
* **Building for the Agent:** If you are a developer tasked with integrating the Glance agent viewer into tools like Salesforce, Zendesk, Genesys, or your own proprietary web dashboard, you will want the **Browser Agent SDK**.
* **Building for the App User:** If you need to allow customers to share their mobile app screen with your support team, use the **Mobile SDK** (available for iOS and Android).
* **Building for the Web User:** If you want to dynamically launch sessions for customers visiting your website without requiring them to download anything, the **Guest Join SDK** is your go-to.
=================================================================
FILE: /developer/sdk/mobile_sdk/flows
=================================================================
The following flowcharts illustrate Glance's operations when using the mobile SDK.
## Initialize Glance and Join a Session
 ## Presence Connect Flow from Mobile SDK Host App to Custom Tab in Web Browser
 =================================================================
FILE: /developer/sdk/mobile_sdk
=================================================================
The mobile SDK is easy to integrate into your mobile apps and pairs with pre-built integrations to agent desktops of CRM, CCaaS, and custom systems to offer a complete, out-of-the-box solution.
## iOS
Get started integrating Glance into your iOS Apps with Swift or Objective-C.
* **[iOS SDK](https://gitlab.com/glance-sdk-public/glance-sdk-ios-releases):** Provides essential core features, enabling our customers to implement event handling without a UI.
* **[iOS Default UI SDK](https://gitlab.com/glance-sdk-public/glance-default-ui-ios-releases):** An out-of-the-box implementation of our iOS SDK with a default UI and sample app that can be copied and customized to fit a company's brand.
## Android
Get started integrating Glance into your Android Apps with Kotlin or Java.
* **[Android SDK](https://gitlab.com/glance-sdk-public/glance-sdk-android-releases):** Provides essential core features, enabling our customers to implement event handling without a UI.
* **[Android Default UI SDK](https://gitlab.com/glance-sdk-public/glance-default-ui-android-releases):** An out-of-the-box implementation of our Android SDK with a default UI and sample app that can be copied and customized to fit a company's brand.
=================================================================
FILE: /developer/sdk/mobile_sdk/masking_android
=================================================================
In **Glance Mobile Cobrowse**, masking is a critical feature used to protect sensitive or private information on the end user�s screen during a live session with an agent. By selectively hiding specific UI elements�such as passwords, credit card fields, or health data�from the representative's view, masking allows companies to safeguard sensitive information while still providing real-time support.
To enable masking during sessions, developers should use the Glance Mobile SDK to designate which portions of the screen should be hidden from agents. Masking integrates with the native rendering layer of the mobile app, allowing developers to selectively hide sensitive views. There are four main contexts in which masking can be applied:
* **View Masking (Traditional Android Views)**
* **Jetpack Compose Masking**
* **WebView Masking**
* **Keyboard Masking**
Below are best practices for each of these contexts, as well as general masking guidelines that apply in all situations.
---
## General Masking
In all contexts, once an element is designated to be masked by the SDK, it will remain obscured from the agent's view for the duration of all current and future sessions. Given this behavior, masking should be applied at the time views are created�during layout or initialization�rather than waiting until a session has begun. This ensures that masking is consistently applied, even if a session starts after the views are already rendered or if views are recreated during the app lifecycle.
Similarly, when a view is destroyed, masking should be removed. In most cases, masking is automatically removed when the view is destroyed, but best practice is to explicitly remove it in the view's destructor. Masking is always applied if the view is visible. If a view is destroyed and no longer present, masking will be removed and will not appear during sessions.
There are, however, situations in which a mask might be applied even though the view is not visible�primarily when the view is covered by another view, which the SDK may not detect. In such cases, if masking is not desired, it should be removed and reapplied when the view becomes visible again.
### Takeaways
* Masked elements remain hidden for the entire session once registered with the SDK.
* Apply masking during view initialization or layout, not after a session begins.
* Always remove masking when a view is destroyed or removed and no longer used.
---
## View Masking
For apps built using traditional Android Views, masking is performed by passing view IDs or view references to the SDK. Masking can be removed by making calls to remove masked views using references to the masked views. Below are the methods that should be used for masking Android views:
```java
// Adding Masked Views by ID
Glance.addMaskedViewId(R.id.sensitiveTextField, "Masked text field");
Glance.addMaskedViewId(R.id.sensitiveLabel, "Masked label");
Glance.addMaskedViewId(R.id.sensitiveButton, "Masked button");
// Adding Masked Views by reference
Glance.addMaskedView(textField, "Masked text field");
Glance.addMaskedView(label, "Masked label");
Glance.addMaskedView(button, "Masked button");
// Removing Masked Views
Glance.removeMaskedViewId(R.id.sensitiveTextField);
Glance.removeMaskedView(textField);
```
When using traditional Android Views, the SDK utilizes the view�s visibility to determine when masks should be displayed. In these cases, you typically do not need to manually add or remove masked views based on visibility. However, there are scenarios where masks might remain visible even when the corresponding views are obstructed�for example, when covered by a `Dialog` or a `Compose` view rendered in a way that prevents the SDK from detecting the obstruction.
In such cases, you may need to explicitly call `removeMaskedView` when the view is no longer visible and reapply it using `addMaskedView` once it becomes visible again.
=================================================================
FILE: /developer/sdk/mobile_sdk
=================================================================
The mobile SDK is easy to integrate into your mobile apps and pairs with pre-built integrations to agent desktops of CRM, CCaaS, and custom systems to offer a complete, out-of-the-box solution.
## iOS
Get started integrating Glance into your iOS Apps with Swift or Objective-C.
* **[iOS SDK](https://gitlab.com/glance-sdk-public/glance-sdk-ios-releases):** Provides essential core features, enabling our customers to implement event handling without a UI.
* **[iOS Default UI SDK](https://gitlab.com/glance-sdk-public/glance-default-ui-ios-releases):** An out-of-the-box implementation of our iOS SDK with a default UI and sample app that can be copied and customized to fit a company's brand.
## Android
Get started integrating Glance into your Android Apps with Kotlin or Java.
* **[Android SDK](https://gitlab.com/glance-sdk-public/glance-sdk-android-releases):** Provides essential core features, enabling our customers to implement event handling without a UI.
* **[Android Default UI SDK](https://gitlab.com/glance-sdk-public/glance-default-ui-android-releases):** An out-of-the-box implementation of our Android SDK with a default UI and sample app that can be copied and customized to fit a company's brand.
=================================================================
FILE: /developer/sdk/mobile_sdk/masking_android
=================================================================
In **Glance Mobile Cobrowse**, masking is a critical feature used to protect sensitive or private information on the end user�s screen during a live session with an agent. By selectively hiding specific UI elements�such as passwords, credit card fields, or health data�from the representative's view, masking allows companies to safeguard sensitive information while still providing real-time support.
To enable masking during sessions, developers should use the Glance Mobile SDK to designate which portions of the screen should be hidden from agents. Masking integrates with the native rendering layer of the mobile app, allowing developers to selectively hide sensitive views. There are four main contexts in which masking can be applied:
* **View Masking (Traditional Android Views)**
* **Jetpack Compose Masking**
* **WebView Masking**
* **Keyboard Masking**
Below are best practices for each of these contexts, as well as general masking guidelines that apply in all situations.
---
## General Masking
In all contexts, once an element is designated to be masked by the SDK, it will remain obscured from the agent's view for the duration of all current and future sessions. Given this behavior, masking should be applied at the time views are created�during layout or initialization�rather than waiting until a session has begun. This ensures that masking is consistently applied, even if a session starts after the views are already rendered or if views are recreated during the app lifecycle.
Similarly, when a view is destroyed, masking should be removed. In most cases, masking is automatically removed when the view is destroyed, but best practice is to explicitly remove it in the view's destructor. Masking is always applied if the view is visible. If a view is destroyed and no longer present, masking will be removed and will not appear during sessions.
There are, however, situations in which a mask might be applied even though the view is not visible�primarily when the view is covered by another view, which the SDK may not detect. In such cases, if masking is not desired, it should be removed and reapplied when the view becomes visible again.
### Takeaways
* Masked elements remain hidden for the entire session once registered with the SDK.
* Apply masking during view initialization or layout, not after a session begins.
* Always remove masking when a view is destroyed or removed and no longer used.
---
## View Masking
For apps built using traditional Android Views, masking is performed by passing view IDs or view references to the SDK. Masking can be removed by making calls to remove masked views using references to the masked views. Below are the methods that should be used for masking Android views:
```java
// Adding Masked Views by ID
Glance.addMaskedViewId(R.id.sensitiveTextField, "Masked text field");
Glance.addMaskedViewId(R.id.sensitiveLabel, "Masked label");
Glance.addMaskedViewId(R.id.sensitiveButton, "Masked button");
// Adding Masked Views by reference
Glance.addMaskedView(textField, "Masked text field");
Glance.addMaskedView(label, "Masked label");
Glance.addMaskedView(button, "Masked button");
// Removing Masked Views
Glance.removeMaskedViewId(R.id.sensitiveTextField);
Glance.removeMaskedView(textField);
```
When using traditional Android Views, the SDK utilizes the view�s visibility to determine when masks should be displayed. In these cases, you typically do not need to manually add or remove masked views based on visibility. However, there are scenarios where masks might remain visible even when the corresponding views are obstructed�for example, when covered by a `Dialog` or a `Compose` view rendered in a way that prevents the SDK from detecting the obstruction.
In such cases, you may need to explicitly call `removeMaskedView` when the view is no longer visible and reapply it using `addMaskedView` once it becomes visible again.
Glance Docs
Get the most out of Glance. Access comprehensive guides, API documentation, and configuration best practices to seamlessly integrate Glance into your customer engagement strategy.
Integration guides and SDKs for bringing Glance into your web, mobile, and desktop applications.
Direct access to our REST APIs for managing users, sessions, reporting data, and webhooks.
Admin configuration, security & compliance protocols, and user guides for managing your Glance account.
Stay up to date with the latest features, improvements, and fixes across the Glance platform.
 4. When a visitor is detected on the current Salesforce Object, the **Glance Component** displays the following information:
* **Type:** Desktop Web, Mobile Web, or Mobile App (SDK).
* **URL:** The URL of the page the visitor is browsing; you can hover over the URL to view the entire path.
* **Browser:** The browser the visitor is using and its version.
* **OS:** The Operating System for the visitor.
4. When a visitor is detected on the current Salesforce Object, the **Glance Component** displays the following information:
* **Type:** Desktop Web, Mobile Web, or Mobile App (SDK).
* **URL:** The URL of the page the visitor is browsing; you can hover over the URL to view the entire path.
* **Browser:** The browser the visitor is using and its version.
* **OS:** The Operating System for the visitor.
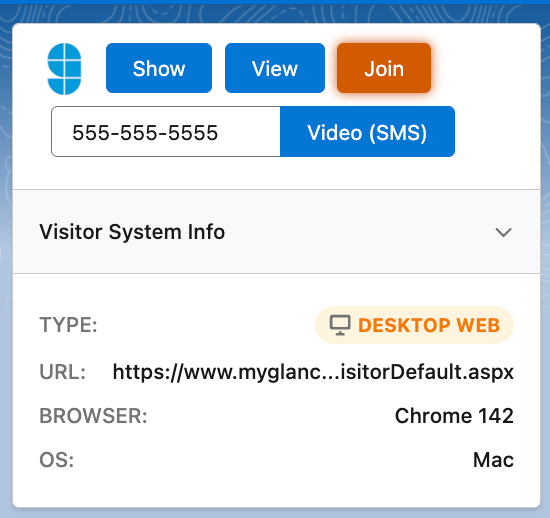 =================================================================
FILE: /users/Integrations/service-target-urls
=================================================================
## What is a Service Target URL?
A *Service Target URL* (STU) is a hyperlink that links directly to a specific Glance service or task.
For example, when a Glance user visits an Agent Join STU, they immediately see the page where they can enter a session code provided by a customer to join a session. (If the user is not yet logged in to Glance, they are prompted to log in first).
=================================================================
FILE: /users/Integrations/service-target-urls
=================================================================
## What is a Service Target URL?
A *Service Target URL* (STU) is a hyperlink that links directly to a specific Glance service or task.
For example, when a Glance user visits an Agent Join STU, they immediately see the page where they can enter a session code provided by a customer to join a session. (If the user is not yet logged in to Glance, they are prompted to log in first).
 The base URL for the Agent Join page is:
```text
https://www.glance.net/agentjoin/agentjoin.aspx
```
When setting up Glance for your users, you can embed STUs in their web portal or application. For example, to produce a "Join Session" link, add this HTML code:
```html
Join a Glance Session
```
---
## STUs without Single Sign-On
These URLs are for standard accounts that do not use SAML SSO.
* `https://www.glance.net/agentjoin/AgentJoin.aspx` – Prompts the agent for a session key.
* `https://www.glance.net/agentjoin/AgentView.aspx?SessionKey=1234` – Joins a specific session directly. Replace `1234` with the actual session key.
### Identity Parameters
You can add these parameters to either the **AgentJoin** or **AgentView** STUs to identify the agent. When available, Glance displays this identity to the visitor as the session starts.
* `name=User+Name` – displays the user's personal information, including name, email, and phone number, as a courtesy to individuals using Glance to request assistance.
* `email=user@example.com` – Displays the user's email.
* `phone=(111)222-3333` – Displays the user's telephone number.
### Control Parameters (AgentJoin Only)
The AgentJoin URL supports optional parameters to modify its behavior.
* `viewersamewindow=1` – Initiates the session viewer within the same browser window that displays the session key prompt. If omitted, Glance launches the viewer in a new window by default.
The following optional parameters control the prompt on the AgentJoin page. For more information on configuring these, please contact Glance Customer Success.
* `mode=universaljoin`
* `mode=chatinvitation`
* `mode=smsinvitation`
---
## STUs with Single Sign-On
For accounts utilizing **SAML 2.0 Single Sign-On**, you must use SSO-specific STUs. These require an identity provider identifier, which corresponds to the account's numeric Group ID.
The base URL for the Agent Join page is:
```text
https://www.glance.net/agentjoin/agentjoin.aspx
```
When setting up Glance for your users, you can embed STUs in their web portal or application. For example, to produce a "Join Session" link, add this HTML code:
```html
Join a Glance Session
```
---
## STUs without Single Sign-On
These URLs are for standard accounts that do not use SAML SSO.
* `https://www.glance.net/agentjoin/AgentJoin.aspx` – Prompts the agent for a session key.
* `https://www.glance.net/agentjoin/AgentView.aspx?SessionKey=1234` – Joins a specific session directly. Replace `1234` with the actual session key.
### Identity Parameters
You can add these parameters to either the **AgentJoin** or **AgentView** STUs to identify the agent. When available, Glance displays this identity to the visitor as the session starts.
* `name=User+Name` – displays the user's personal information, including name, email, and phone number, as a courtesy to individuals using Glance to request assistance.
* `email=user@example.com` – Displays the user's email.
* `phone=(111)222-3333` – Displays the user's telephone number.
### Control Parameters (AgentJoin Only)
The AgentJoin URL supports optional parameters to modify its behavior.
* `viewersamewindow=1` – Initiates the session viewer within the same browser window that displays the session key prompt. If omitted, Glance launches the viewer in a new window by default.
The following optional parameters control the prompt on the AgentJoin page. For more information on configuring these, please contact Glance Customer Success.
* `mode=universaljoin`
* `mode=chatinvitation`
* `mode=smsinvitation`
---
## STUs with Single Sign-On
For accounts utilizing **SAML 2.0 Single Sign-On**, you must use SSO-specific STUs. These require an identity provider identifier, which corresponds to the account's numeric Group ID.
EXAMPLE. You must replace this with your specific Glance Group ID or Partner ID.